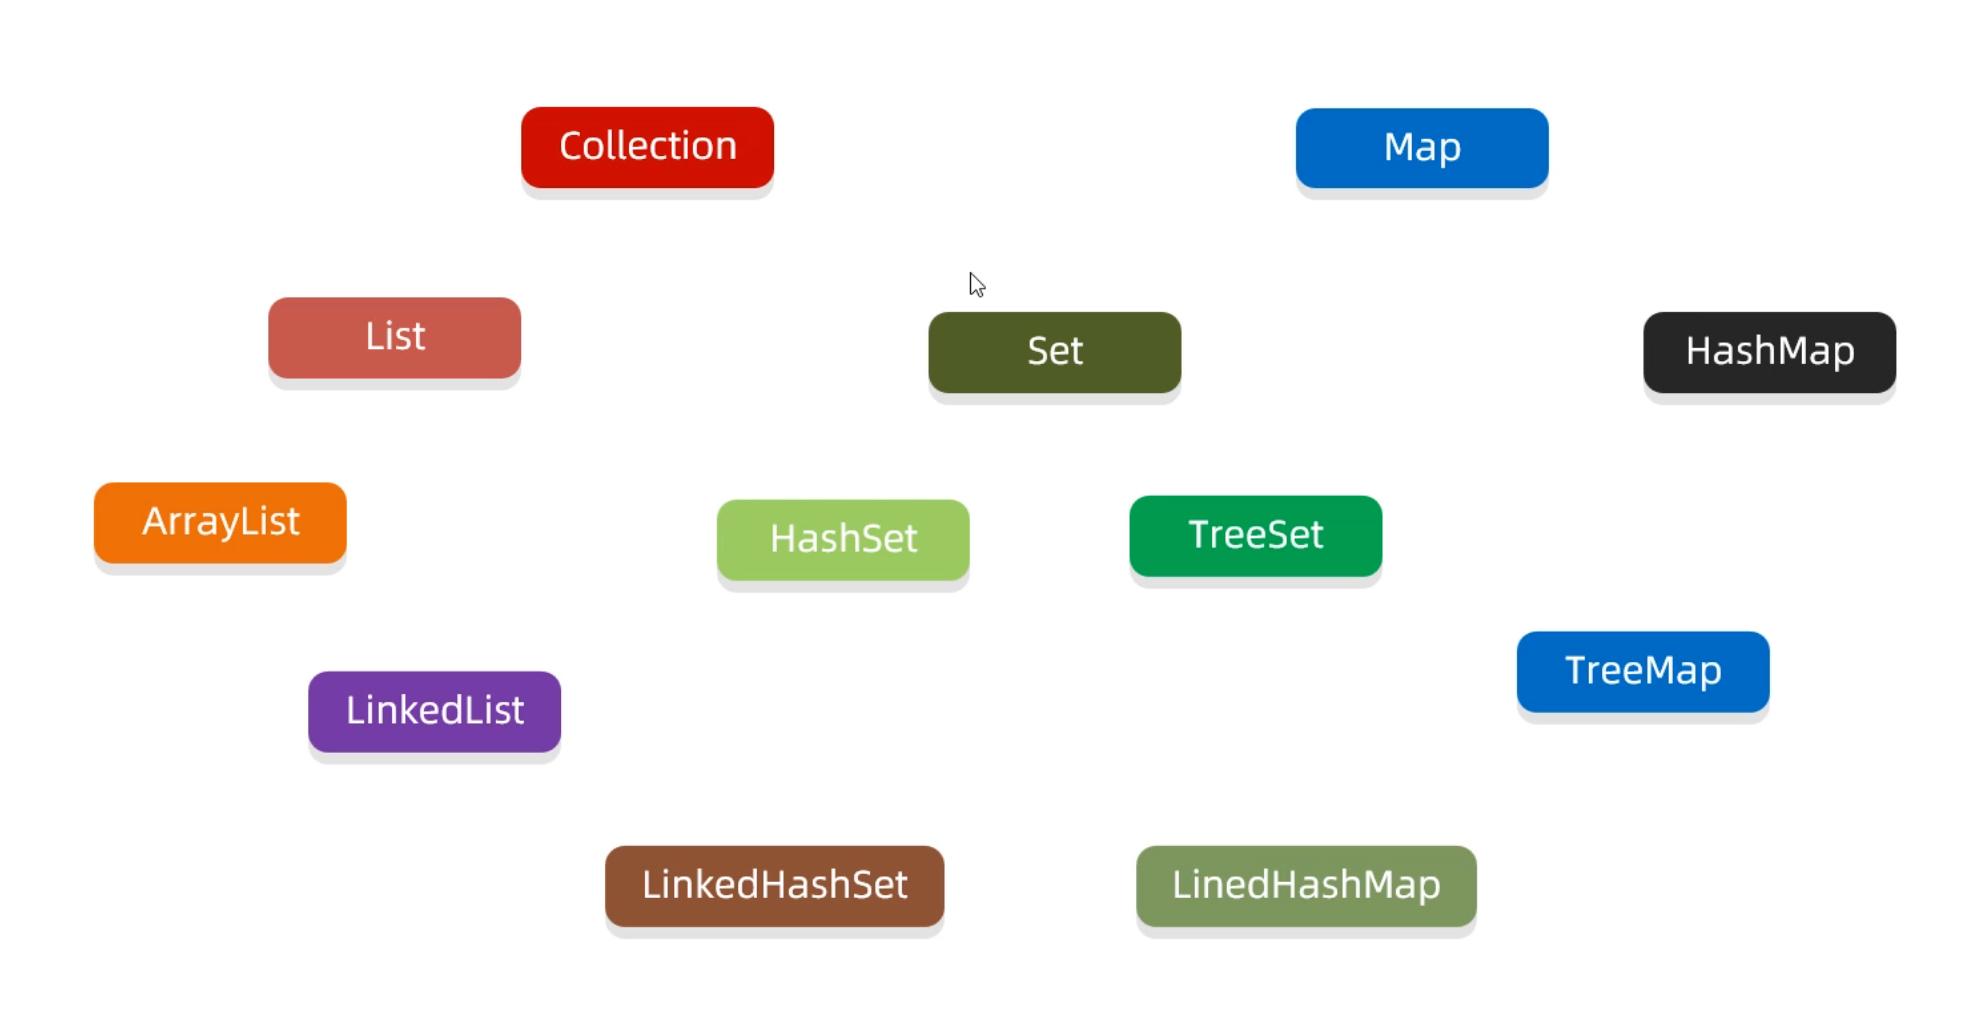
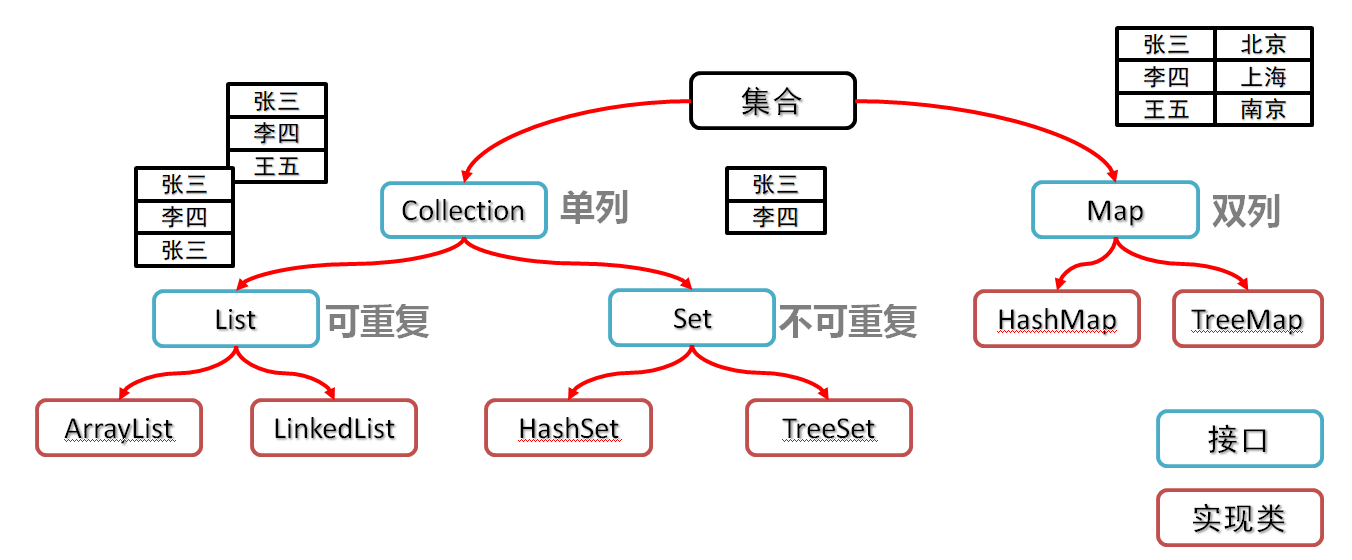
day06—集合进阶(List) 一、集合概述和分类 1.1 集合的分类 前面我们已经学习过了ArrayList集合,但是除了ArrayList集合,Java还提供了很多种其他的集合,如下图所示:
我想你的第一感觉是这些集合好多呀!但是,我们学习时会对这些集合进行分类学习,如下图所示:一类是单列集合元素是一个一个的,另一类是双列集合元素是一对一对的。
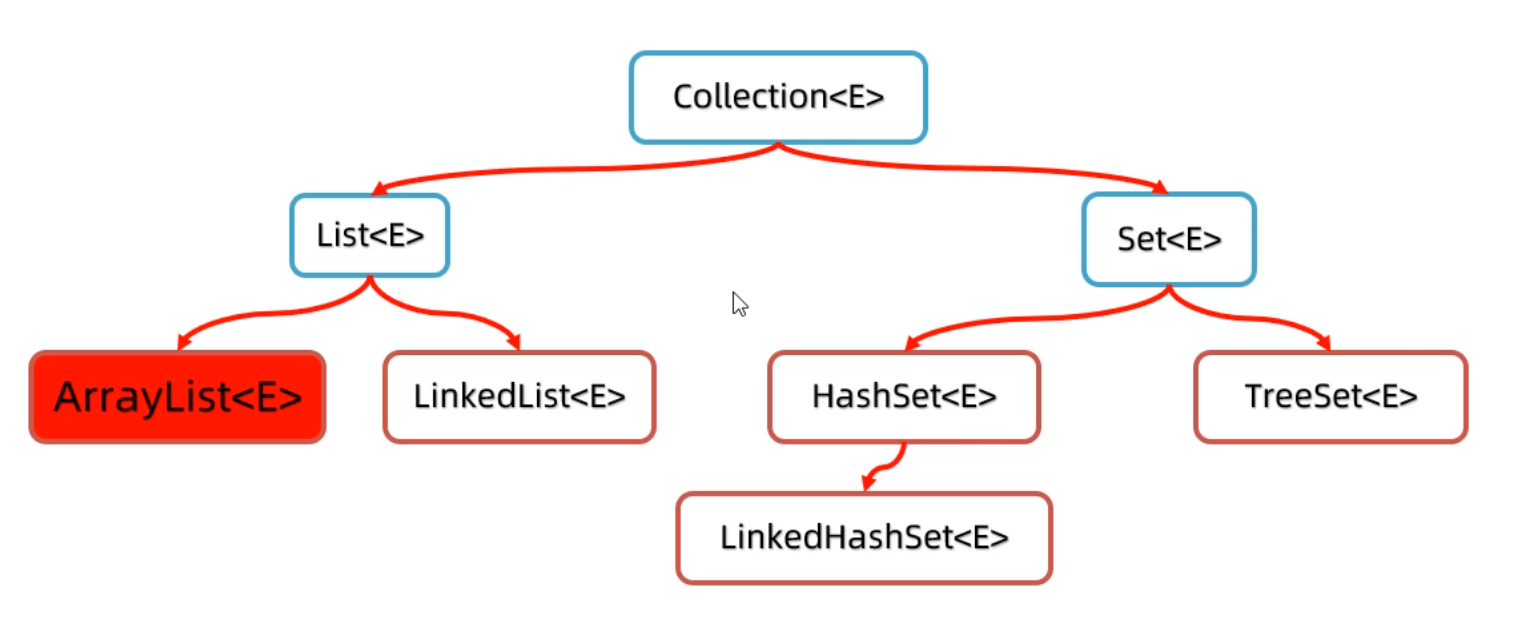
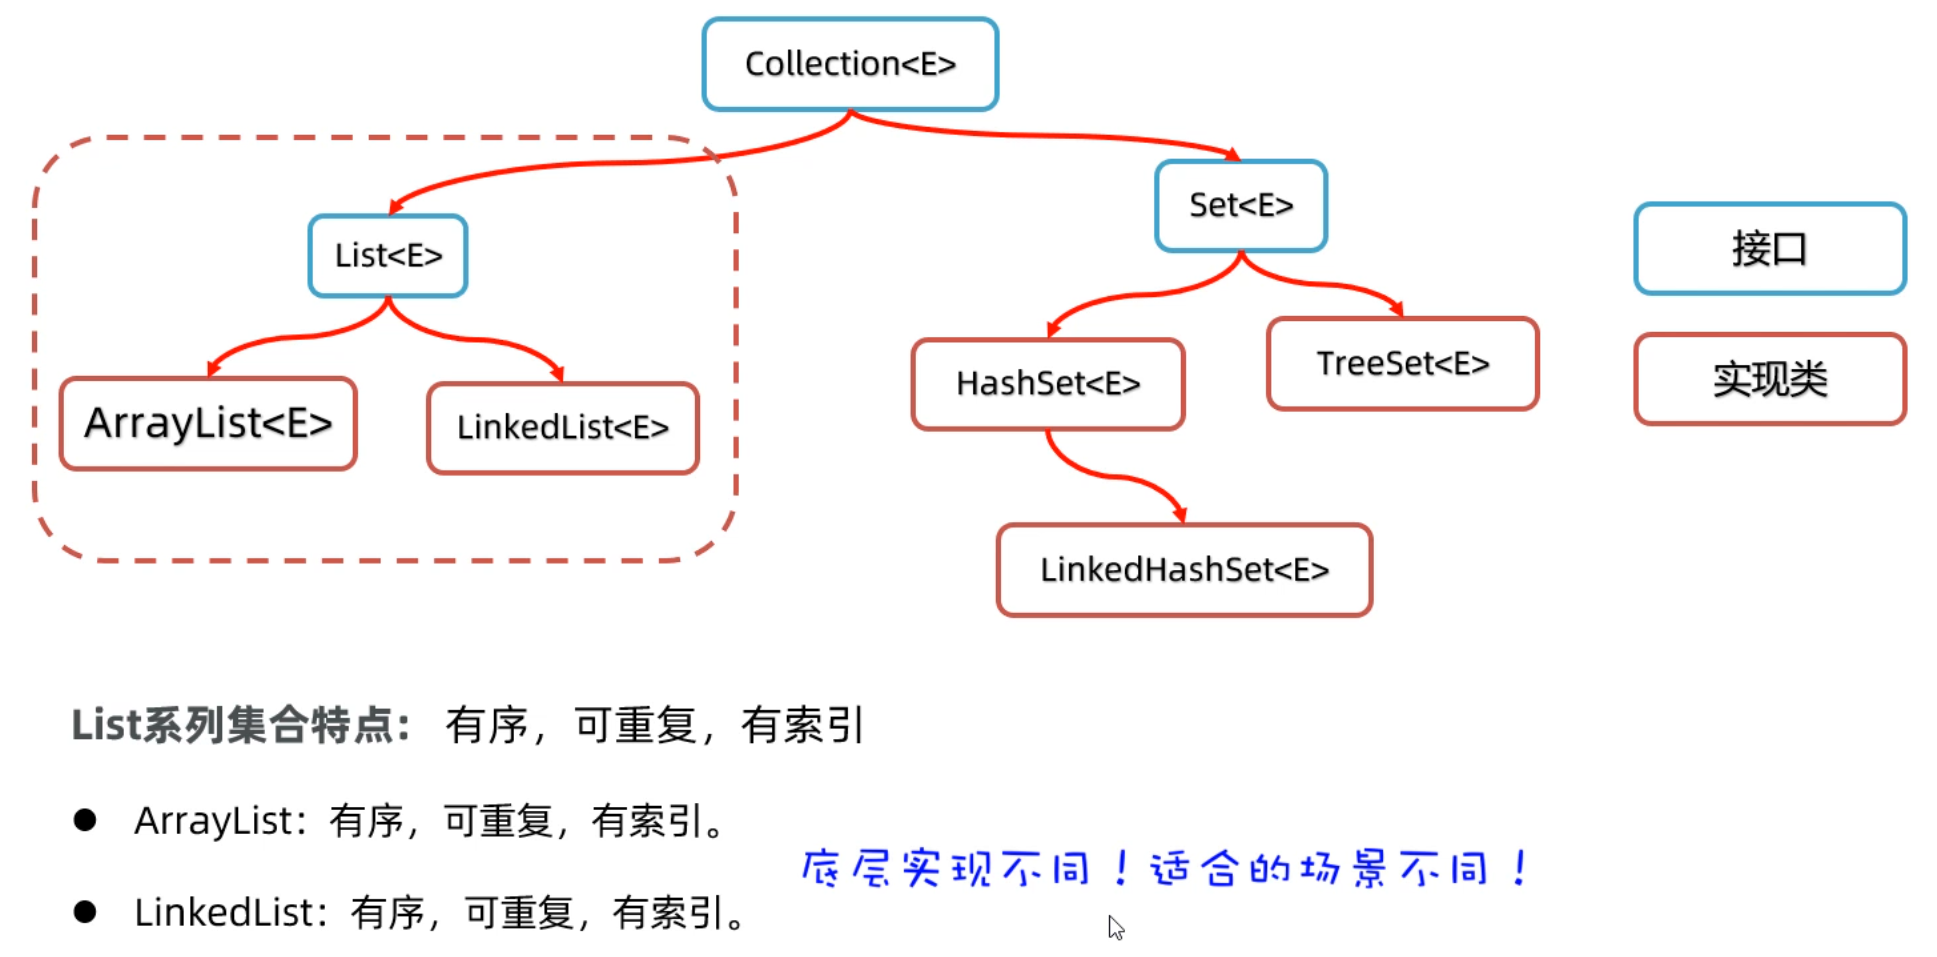
在今天的课程中,主要学习Collection单列集合。Collection是单列集合的根接口,Collection接口下面又有两个子接口List接口、Set接口,List和Set下面分别有不同的实现类,如下图所示:
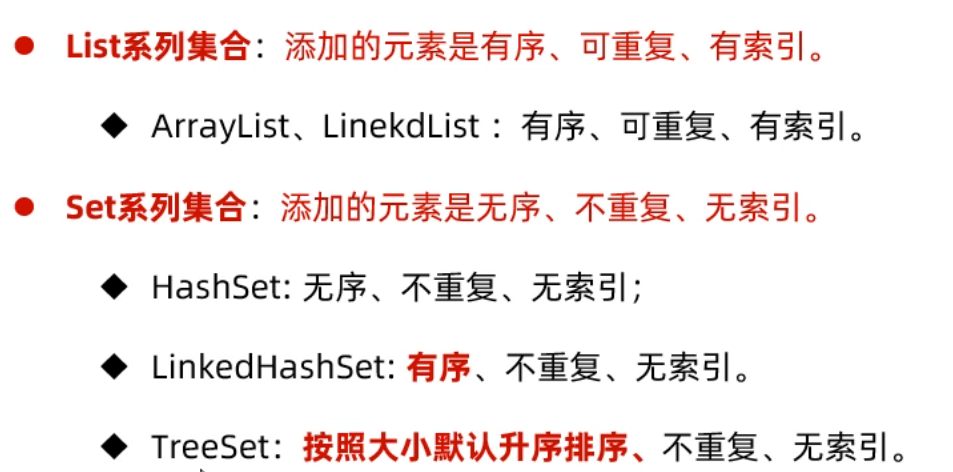
上图中各种集合的特点如下图所示:
更详细的如图所示:
可以自己写代码验证一下,各种集合的特点
1 2 3 4 5 6 7 8 9 10 11 12 13 14 15 ArrayList<String> list = new ArrayList <>(); list.add("java1" ); list.add("java2" ); list.add("java1" ); list.add("java2" ); System.out.println(list); HashSet<String> list = new HashSet <>(); list.add("java1" ); list.add("java2" ); list.add("java1" ); list.add("java2" ); list.add("java3" ); System.out.println(list);
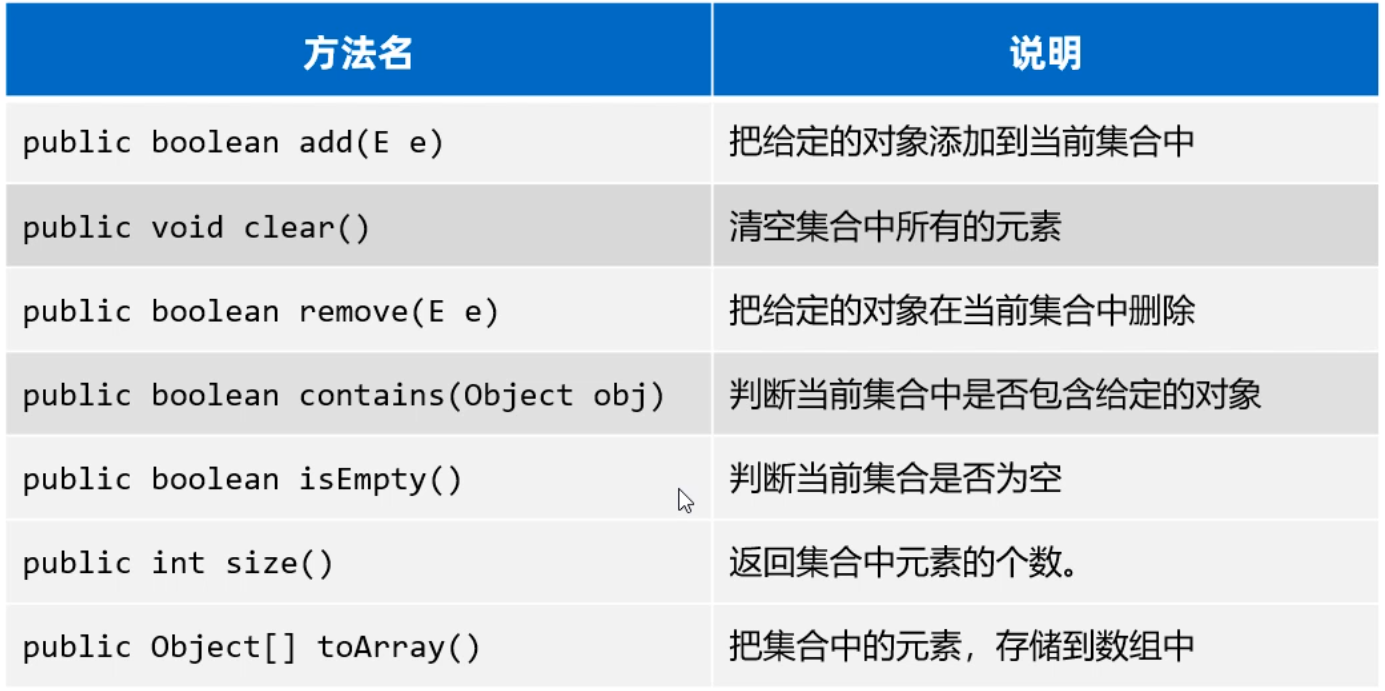
1.2 Collection集合的常用方法 接下来,我们学习一下Collection集合的一些常用方法,这些方法所有Collection实现类都可以使用。 这里我们以创建ArrayList为例,来演示
1
2
3
4
5
6
7
8
9
10
11
12
13
14
15
16
17
18
19
20
21
22
23
24
25
26
27
28
29
30
31
32
33
34
35
36
37
38
39
40
41
42
43
44
Collection<String> c = new ArrayList <>(); c.add("java1" ); c.add("java1" ); c.add("java2" ); c.add("java2" ); c.add("java3" ); System.out.println(c); System.out.println(c.size()); System.out.println(c.contains("java1" )); System.out.println(c.contains("Java1" )); System.out.println(c.remove("java1" )); System.out.println(c); c.clear(); System.out.println(c); System.out.println(c.isEmpty()); Object[] array = c.toArray(); System.out.println(Arrays.toString(array)); String[] array1 = c.toArray(new String [c.size()]); System.out.println(Arrays.toString(array1)); Collection<String> c1 = new ArrayList <>(); c1.add("java1" ); c1.add("java2" ); Collection<String> c2 = new ArrayList <>(); c2.add("java3" ); c2.add("java4" ); c1.addAll(c2); System.out.println(c1);
最后,我们总结一下Collection集合的常用功能有哪些,ArrayList、LinkedList、HashSet、LinkedHashSet、TreeSet集合都可以调用下面的方法。
二、Collection遍历方式 各位同学,接下来我们学习一下Collection集合的遍历方式。有同学说:“集合的遍历之前不是学过吗?就用普通的for循环啊? “ 没错!之前是学过集合遍历,但是之前学习过的遍历方式,只能遍历List集合,不能遍历Set集合,因为以前的普通for循环遍历需要索引,只有List集合有索引 ,而Set集合没有索引。
所以我们需要有一种通用的遍历方式,能够遍历所有集合。
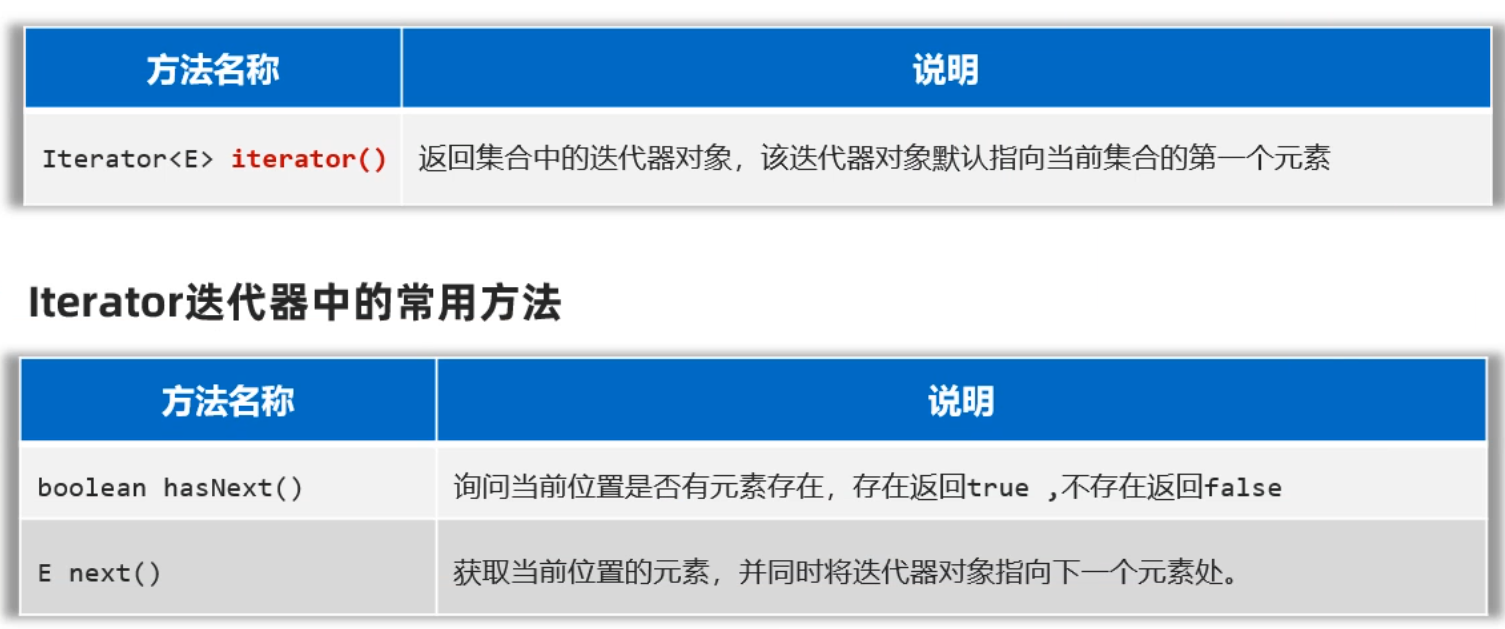
2.1 迭代器遍历集合 接下来学习的迭代器 就是一种集合的通用遍历方式。
代码写法如下:
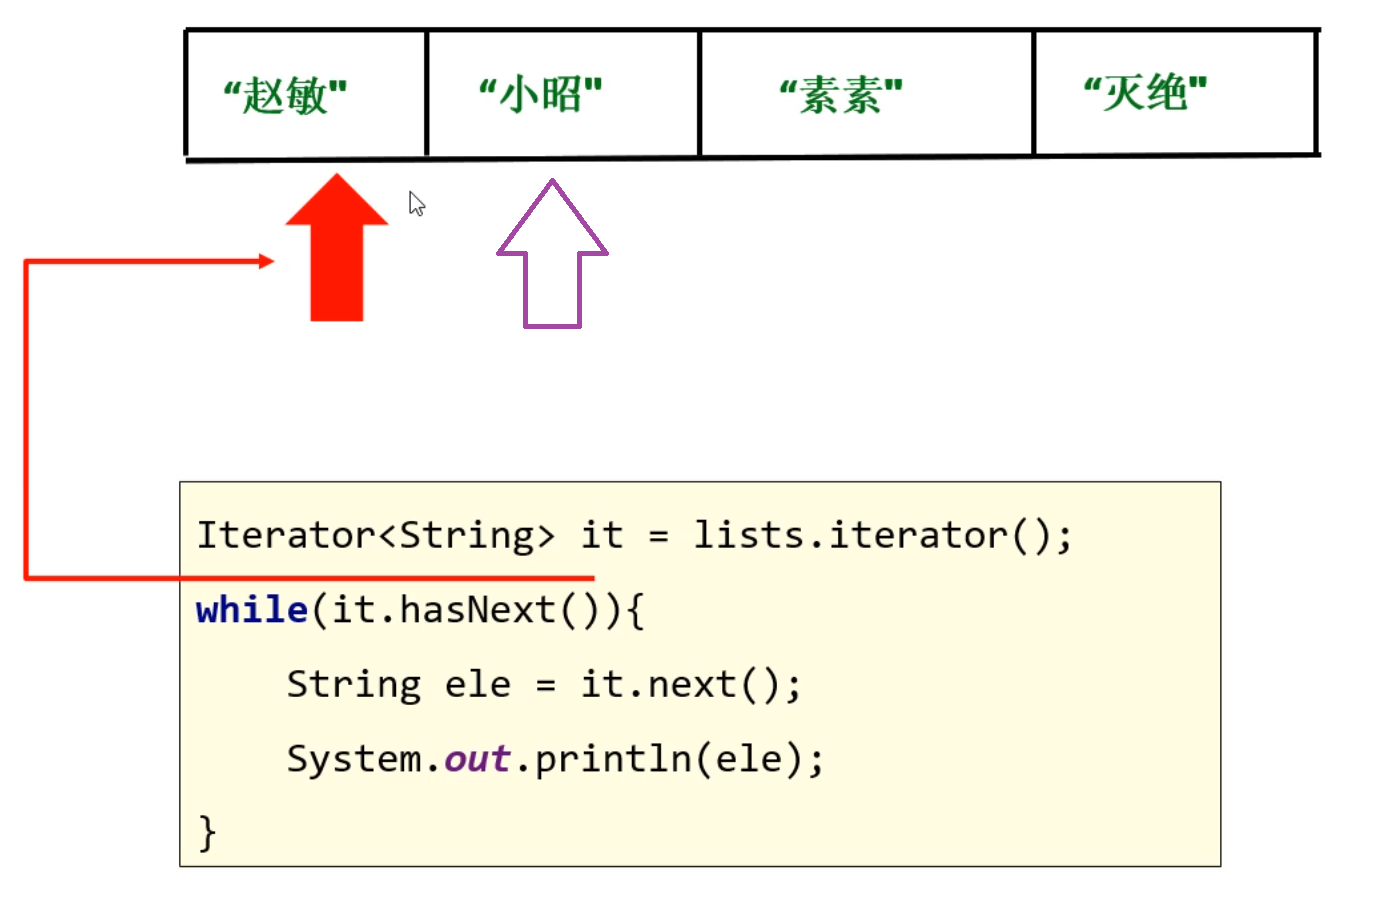
1
2
3
4
5
6
7
8
9
10
11
12
13
14
15
16
17
18
Collection<String> c = new ArrayList <>(); c.add("赵敏" ); c.add("小昭" ); c.add("素素" ); c.add("灭绝" ); System.out.println(c); Iterator<String> it = c.iterator(); while (it.hasNext()){ String e = it.next(); System.out.println(e); }
迭代器代码的原理如下:
当调用iterator()方法获取迭代器时,当前指向第一个元素
hasNext()方法则判断这个位置是否有元素,如果有则返回true,进入循环调用next()方法获取元素 ,并将当前元素指向下一个位置,
等下次循环时,则获取下一个元素,依此内推
最后,我们再总结一下,使用迭代器遍历集合用到哪些方法
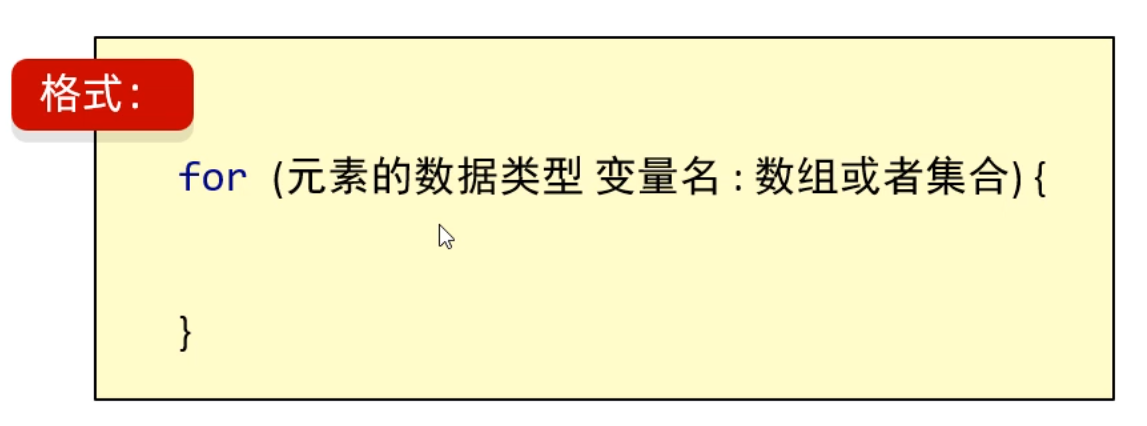
2.2 增强for遍历集合 同学们刚才我们学习了迭代器遍历集合,但是这个代码其实还有一种更加简化的写法,叫做增强for循环。
格式如下:
需要注意的是,增强for不光可以遍历集合,还可以遍历数组。接下来我们用代码演示一下:
1
2
3
4
5
6
7
8
9
10
11
12
13
14
15
16
Collection<String> c = new ArrayList <>(); c.add("赵敏" ); c.add("小昭" ); c.add("素素" ); c.add("灭绝" ); for (String s: c){ System.out.println(s); } String[] arr = {"迪丽热巴" , "古力娜扎" , "稀奇哈哈" }; for (String name: arr){ System.out.println(name); }
2.3 forEach遍历集合 在JDK8版本以后还提供了一个forEach方法也可以遍历集合,如果下图所示:
我们发现forEach方法的参数是一个Consumer接口,而Consumer是一个函数式接口,所以可以传递Lambda表达式
1
2
3
4
5
6
7
8
9
10
11
12
13
14
15
16
17
18
Collection<String> c = new ArrayList <>(); c.add("赵敏" ); c.add("小昭" ); c.add("素素" ); c.add("灭绝" ); c.forEach(new Consumer <String>{ @Override public void accept (String s) { System.out.println(s); } }); c.forEach(s->System.out.println(s));
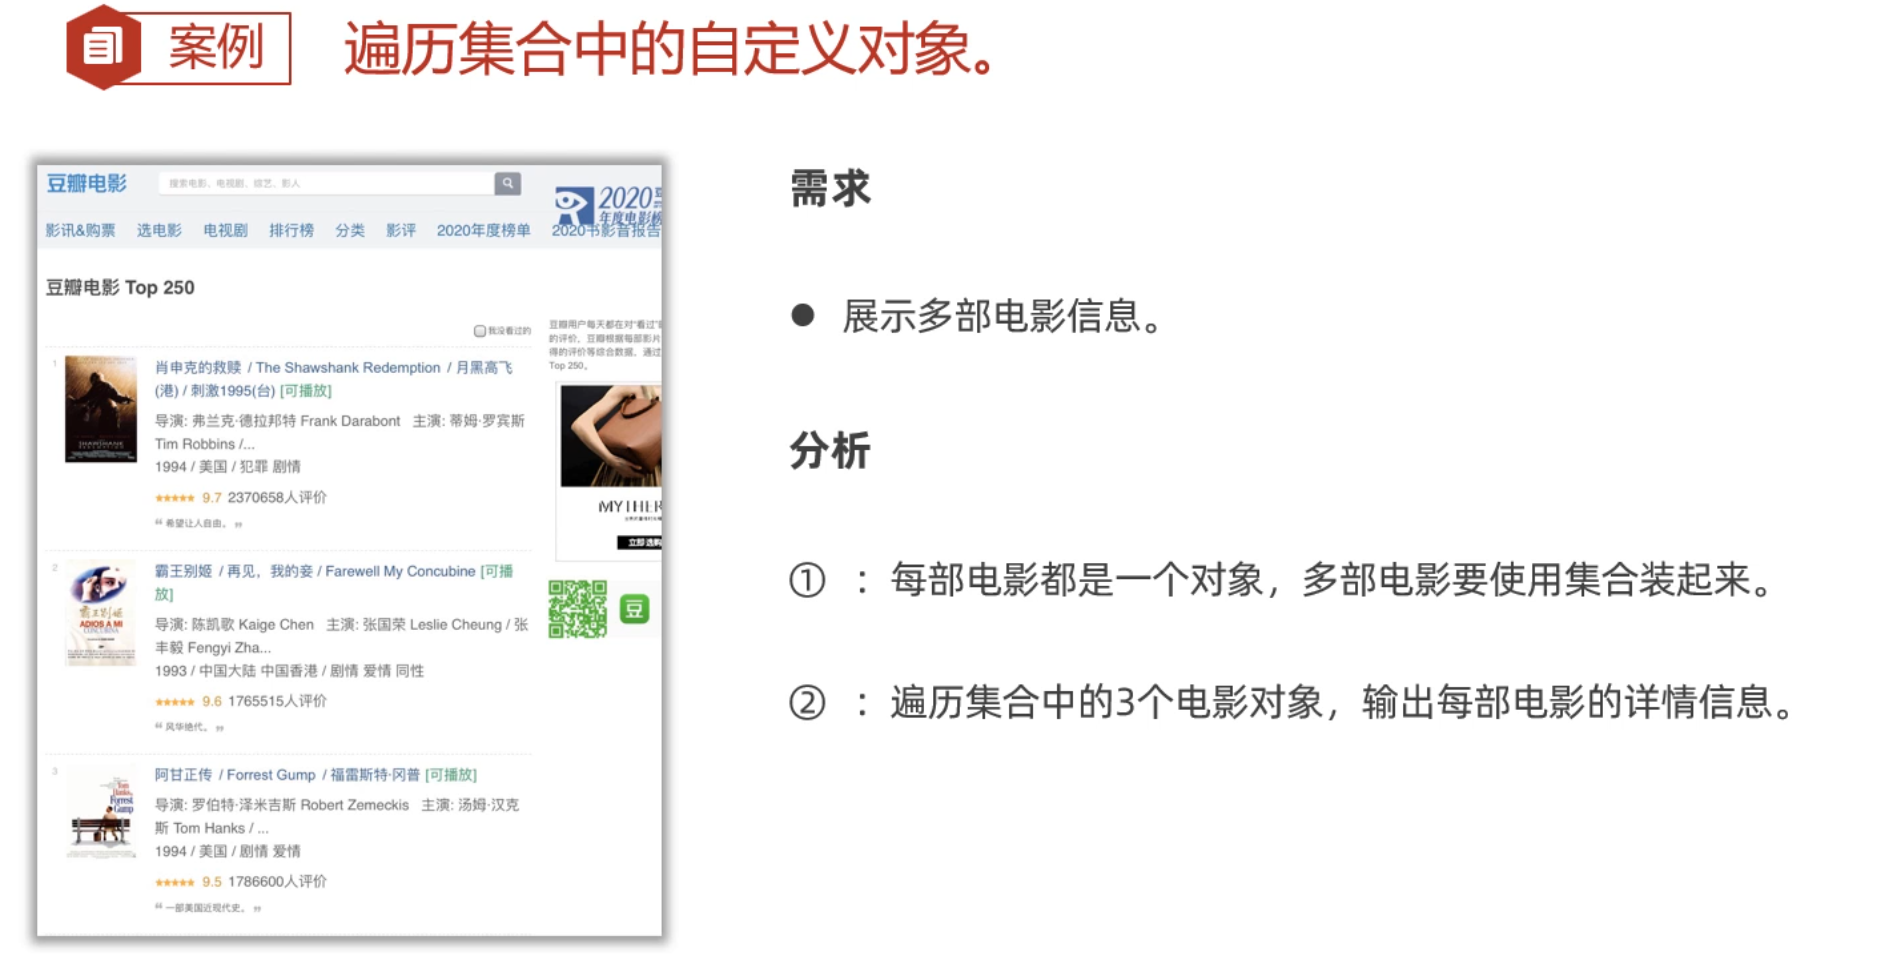
2.4 遍历集合案例 接下来,我们看一个案例,在集合中存储自定义的对象,并遍历。具体要求如下
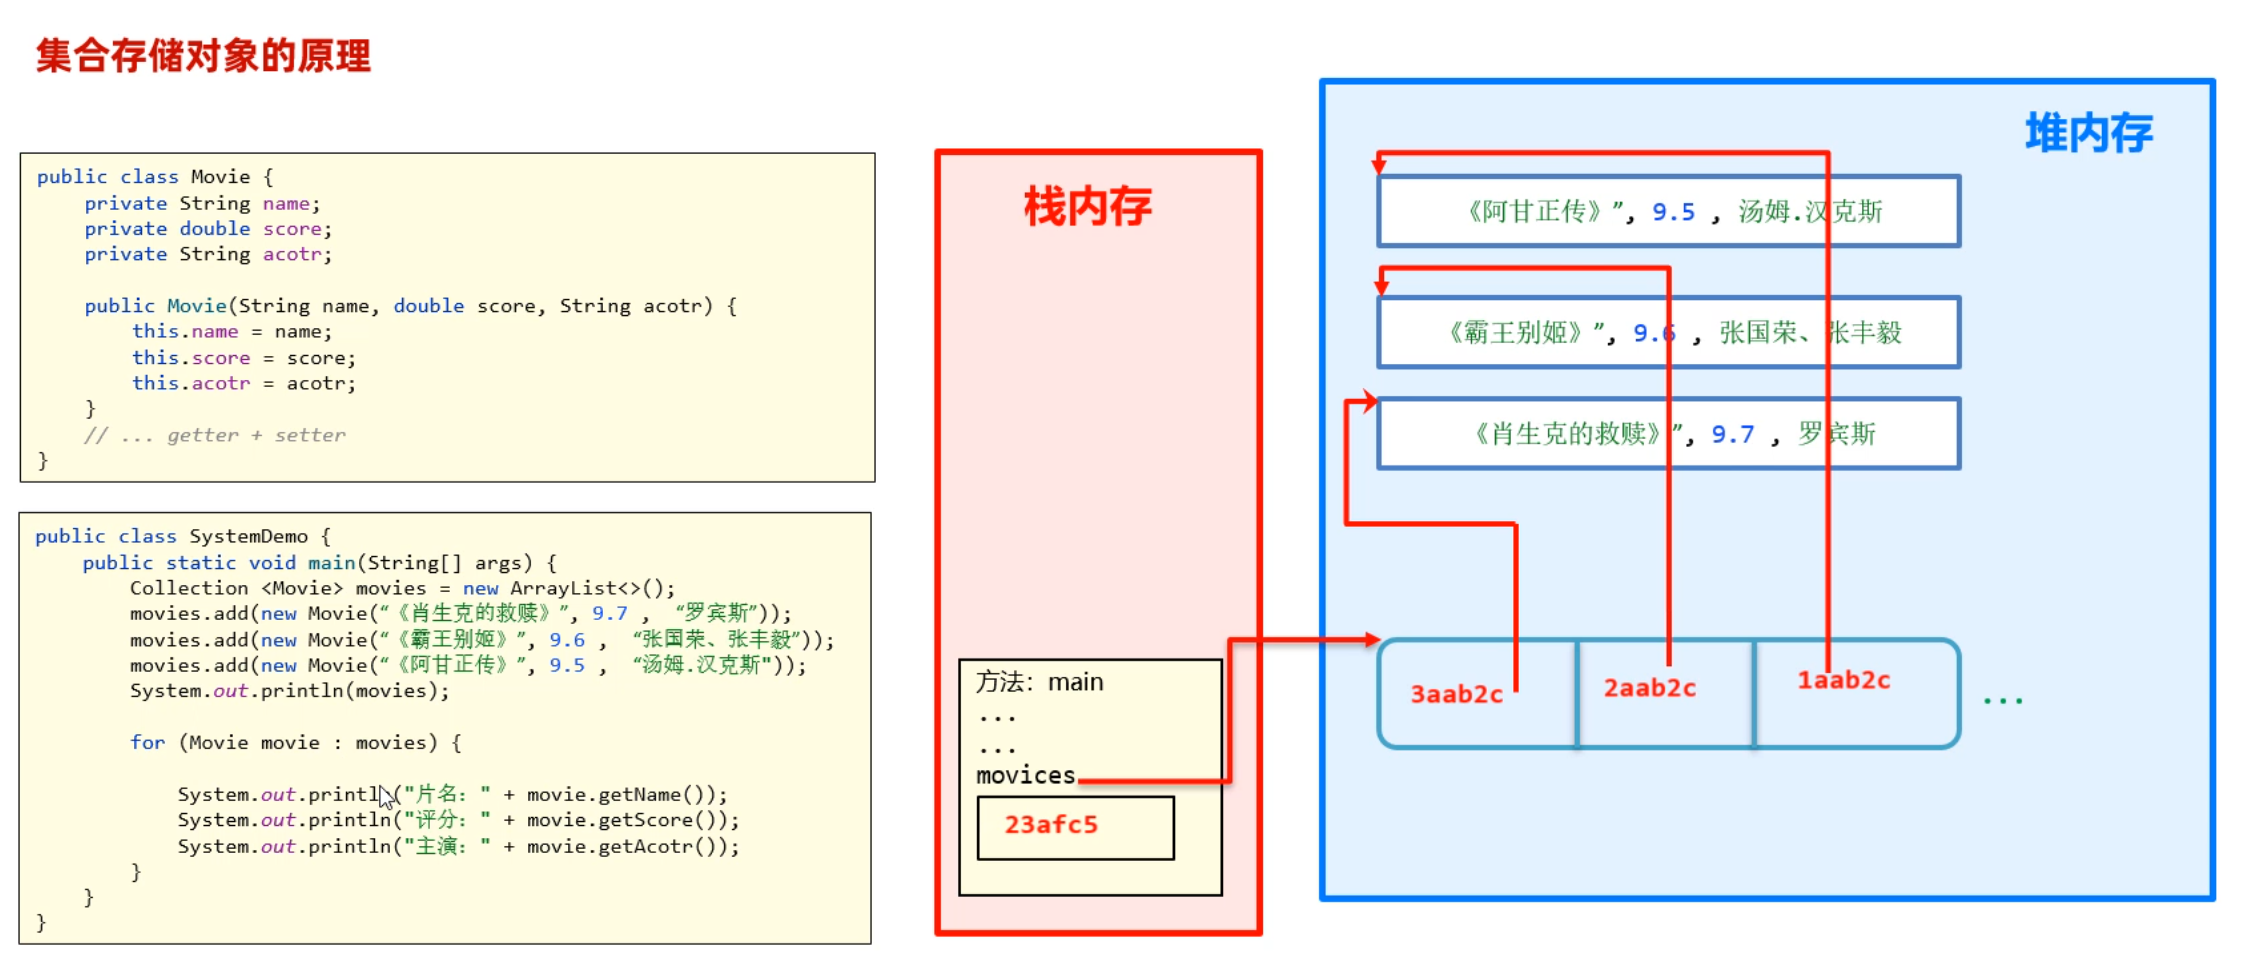
首先,我们得写一个电影类,用来描述每一步电影应该有哪些信息。
1
2
3
4
5
6
7
8
9
10
11
12
13
14
public class Movie { private String name; private double score; private String actor; public Movie () {} public Movie (String name, double score, String actor) { this .name=name; this .score=score; this .actor=actor; } }
接着,再创建一个测试类,完成上面的需求
1
2
3
4
5
6
7
8
9
10
11
12
13
14
public class Test { public static void main (String[] args) { Collection<Movie> movies = new ArrayList <>(); movies.add(new MOvie ("《肖申克的救赎》" , 9.7 , "罗宾斯" )); movies.add(new MOvie ("《霸王别姬》" , 9.6 , "张国荣、张丰毅" )); movies.add(new MOvie ("《阿甘正传》" , 9.5 , "汤姆汉克斯" )); for (Movie movie : movies){ System.out.println("电影名:" + movie.getName()); System.out.println("评分:" + movie.getScore()); System.out.println("主演:" + movie.getActor()); } } }
以上代码的内存原理如下图所示:当往集合中存对象时,实际上存储的是对象的地址值
三、List系列集合 前面我们已经把Collection通用的功能学习完了,接下来我们学习Collection下面的一个子体系List集合。如下图所示:
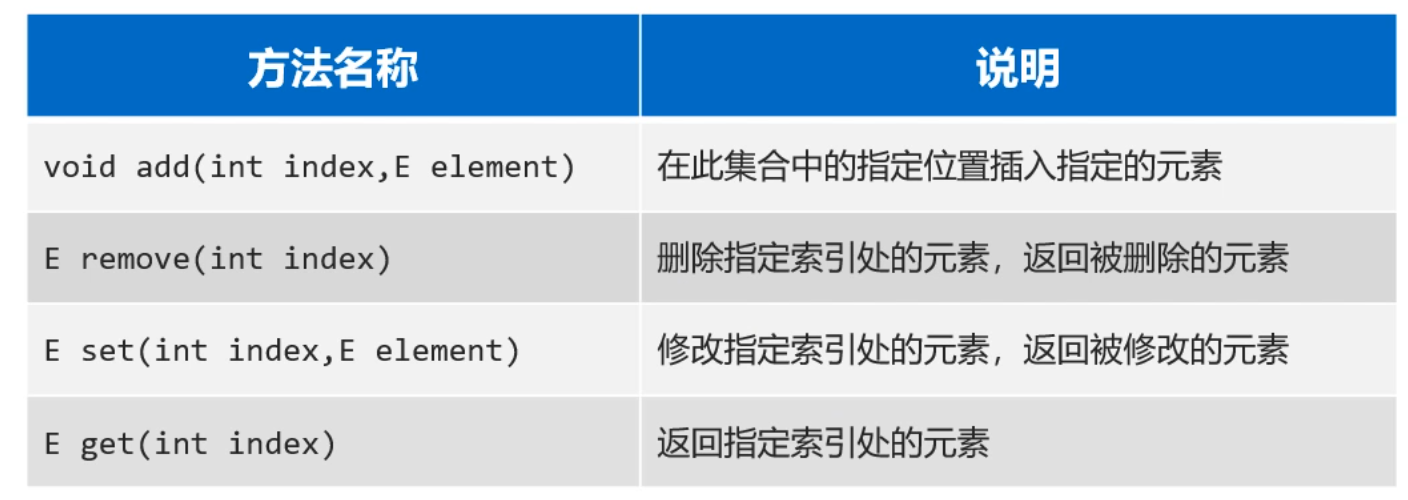
3.1 List集合的常用方法 List集合是索引 的,所以多了一些有索引操作的方法,如下图所示:
接下来,我们用代码演示一下这几个方法的效果
1 2 3 4 5 6 7 8 9 10 11 12 13 14 15 16 17 18 19 20 21 22 List<String> list = new ArrayList <>(); list.add("蜘蛛精" ); list.add("至尊宝" ); list.add("至尊宝" ); list.add("牛夫人" ); System.out.println(list); list.add(2 , "紫霞仙子" ); System.out.println(list); System.out.println(list.remove(2 )); System.out.println(list); System.out.println(list.get(3 )); System.out.println(list.set(3 ,"牛魔王" )); System.out.println(list);
3.2 List集合的遍历方式 List集合相比于前面的Collection多了一种可以通过索引遍历的方式,所以List集合遍历方式一共有四种:
普通for循环(只因为List有索引)
迭代器
增强for
Lambda表达式
1
2
3
4
5
6
7
8
9
10
11
12
13
14
15
16
17
18
19
20
21
22
23
24
25
26
List<String> list = new ArrayList <>(); list.add("蜘蛛精" ); list.add("至尊宝" ); list.add("糖宝宝" ); for (int i = 0 ; i< list.size(); i++){ String e = list.get(i); System.out.println(e); } for (String s : list){ System.out.println(s); } Iterator<String> it = list.iterator(); while (it.hasNext()){ String s = it.next(); System.out.println(s); } list.forEach(s->System.out.println(s));
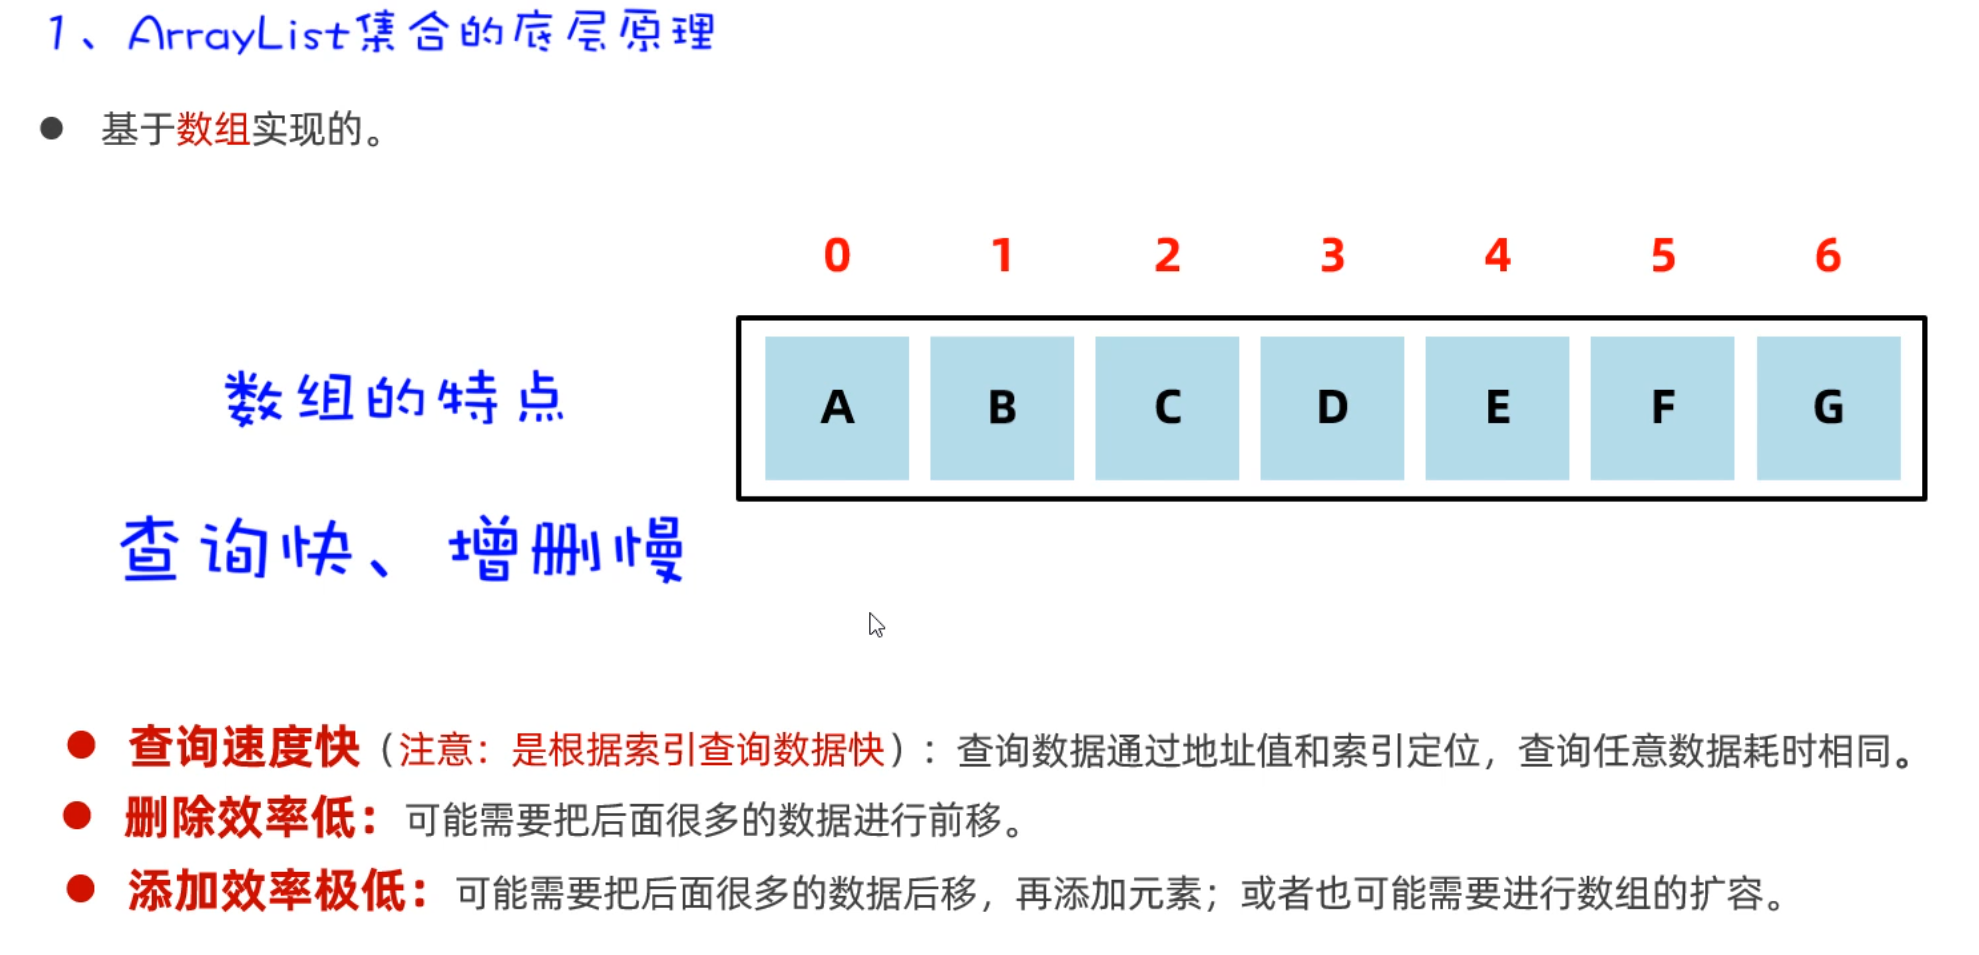
3.3 ArrayList底层的原理
1
2
3
4
5
6
Arrays.toString() Arrays.equals(int [] a, int [] a2) Arrays.copyOf(int [] original, int newLength) Arrays.fill(int [] a, int val) / Arrays.fill(int [] a, int fromIndex, int toIndex, int val) Arrays.sort(int [] a) Arrays.binarySearch(int [] a, int key)
为了让同学们更加透彻的理解ArrayList集合,接下来,学习一下ArrayList集合的底层原理。
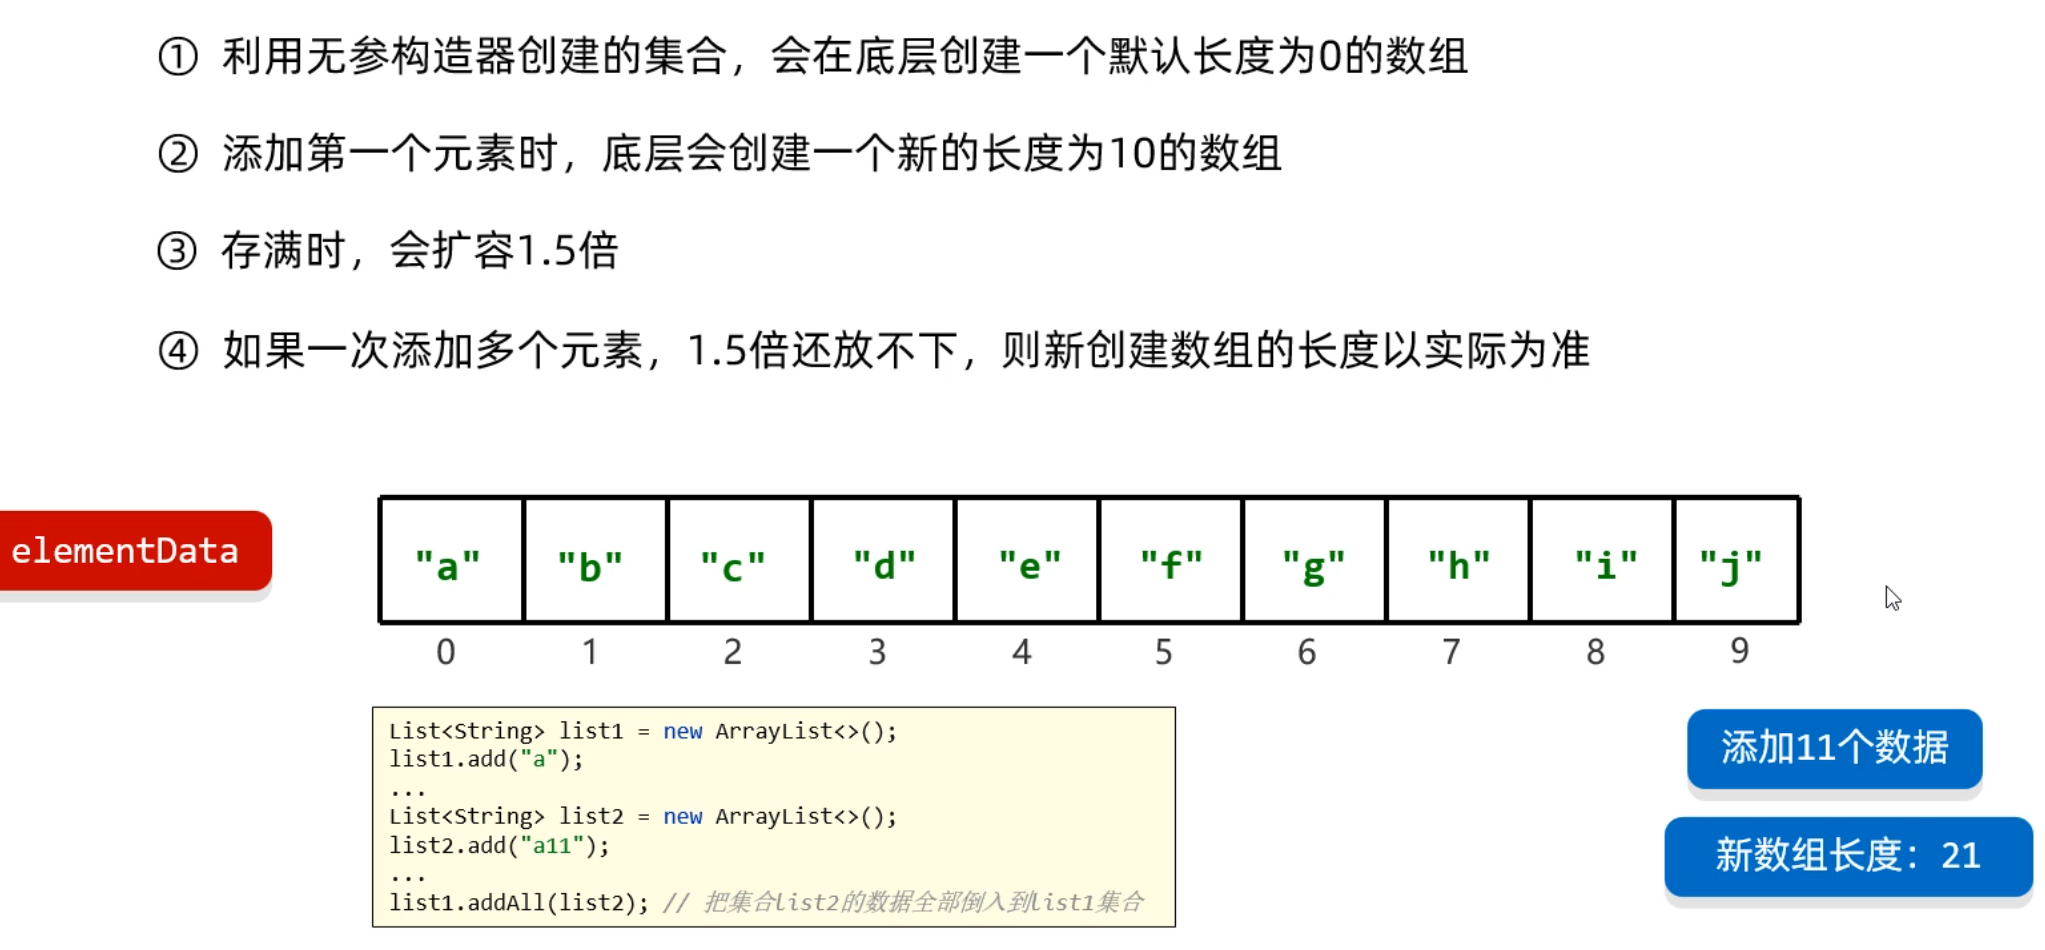
ArrayList集合底层是基于数组结构实现的 ,也就是说当你往集合容器中存储元素时,底层本质上是往数组中存储元素。 特点如下:
我们知道数组的长度是固定的,但是集合的长度是可变的,这是怎么做到的呢?原理如下:
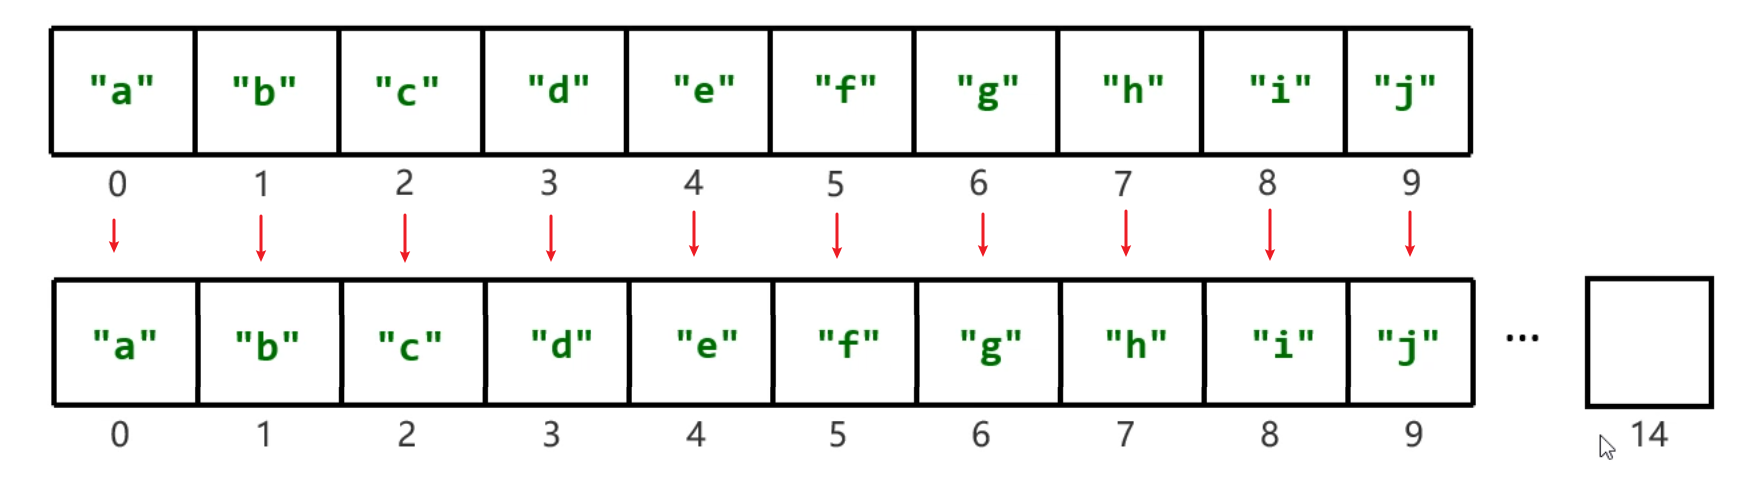
数组扩容,并不是在原数组上扩容(原数组是不可以扩容的),底层是创建一个新数组,然后把原数组中的元素全部复制到新数组中去。
3.4 LinkedList底层原理 学习完ArrayList底层原理之后,接下来我们看一下LinkedList集合的底层原理。
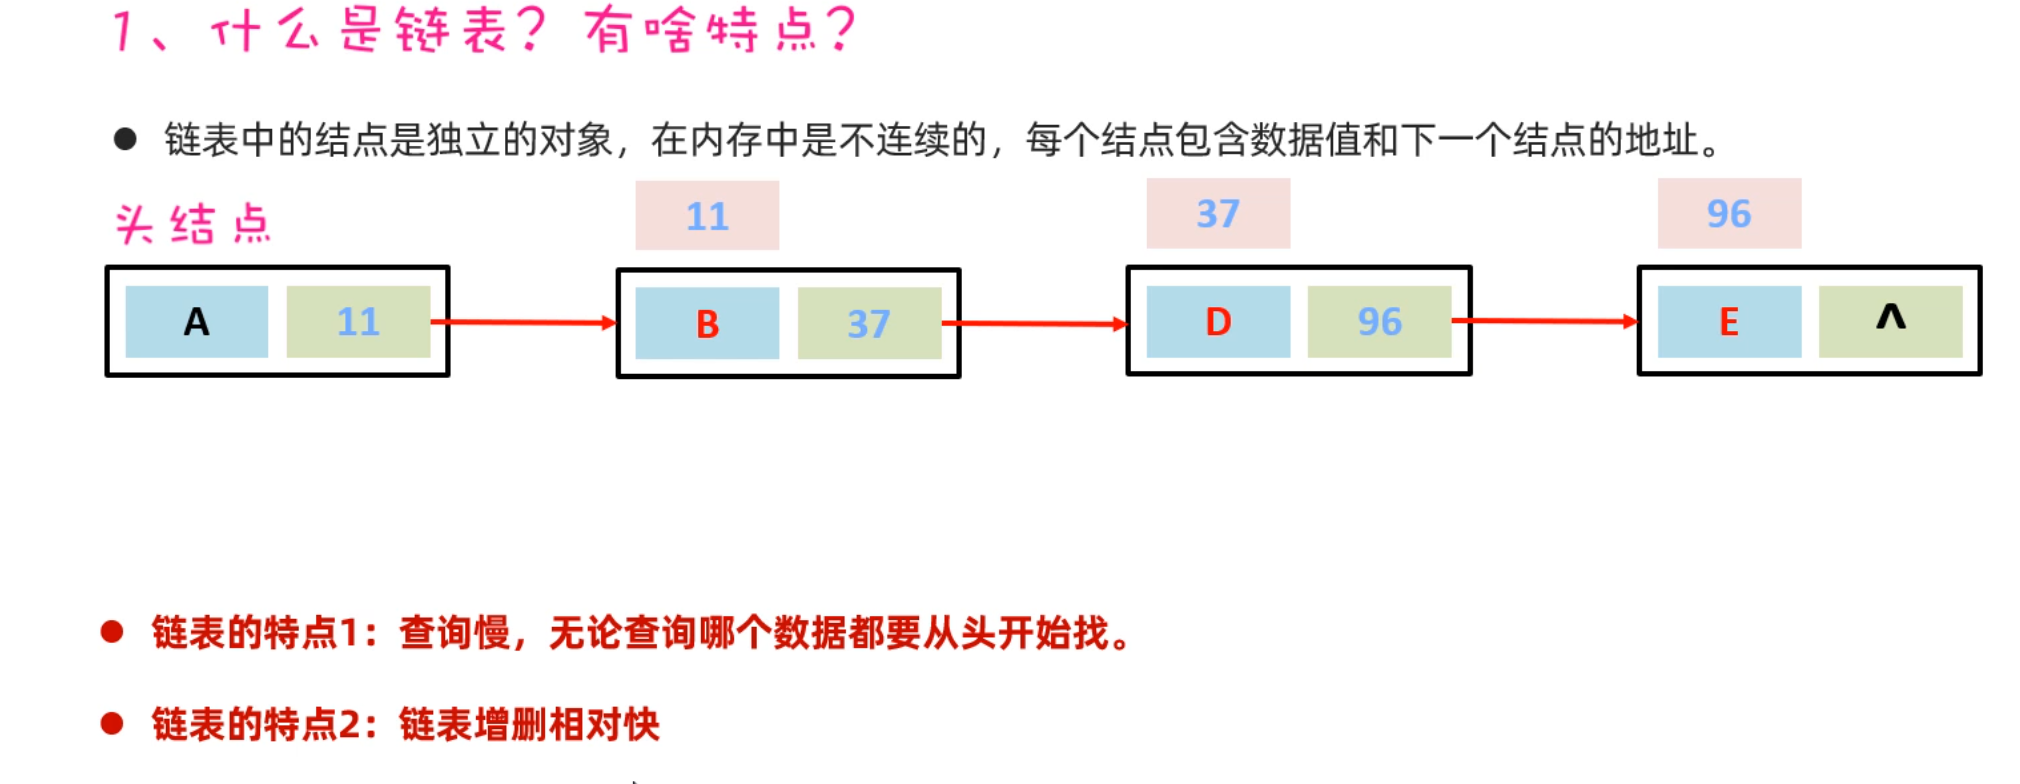
LinkedList底层是链表结构,链表结构是由一个一个的节点组成,一个节点由数据值、下一个元素的地址 组成。如下图所示
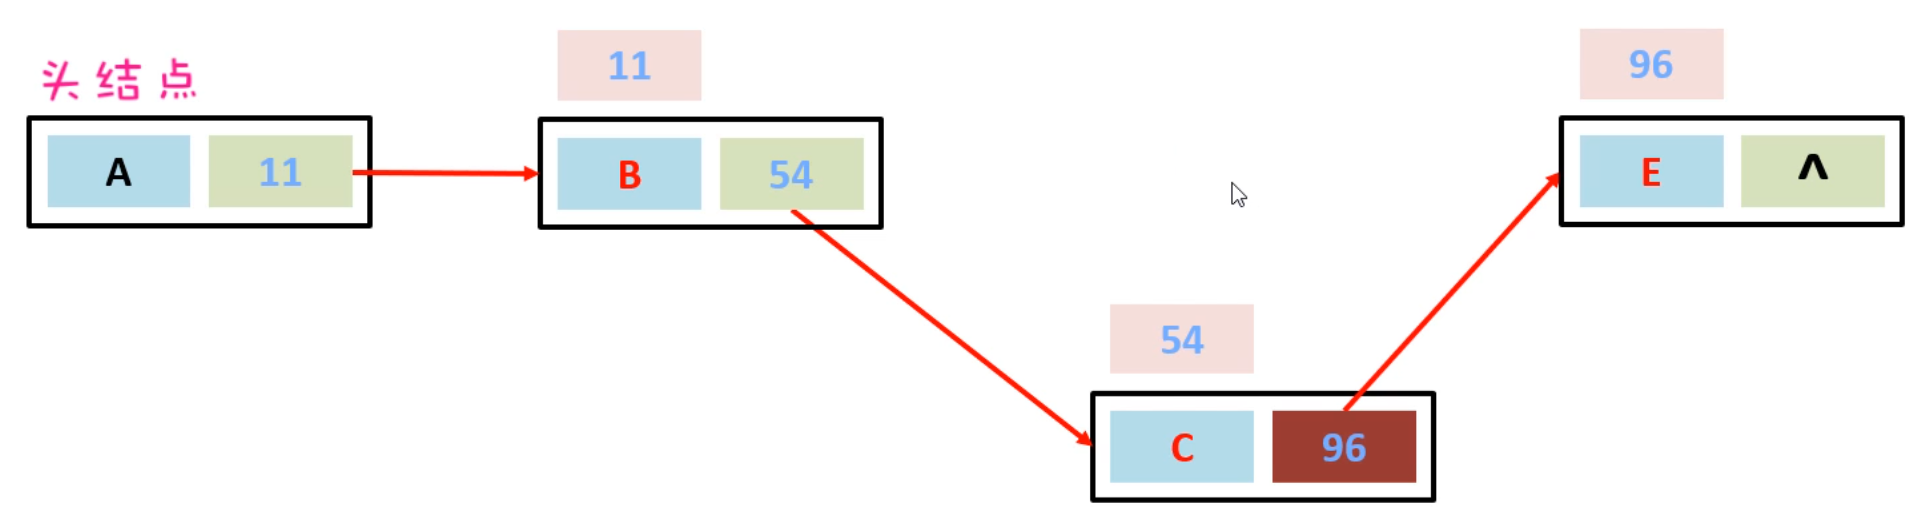
假如,现在要在B节点和D节点中间插入一个元素,只需要把B节点指向D节点的地址断掉,重新指向新的节点地址就可以了。如下图所示:
假如,现在想要把D节点删除,只需要让C节点指向E节点的地址,然后把D节点指向E节点的地址断掉。此时D节点就会变成垃圾,会把垃圾回收器清理掉。
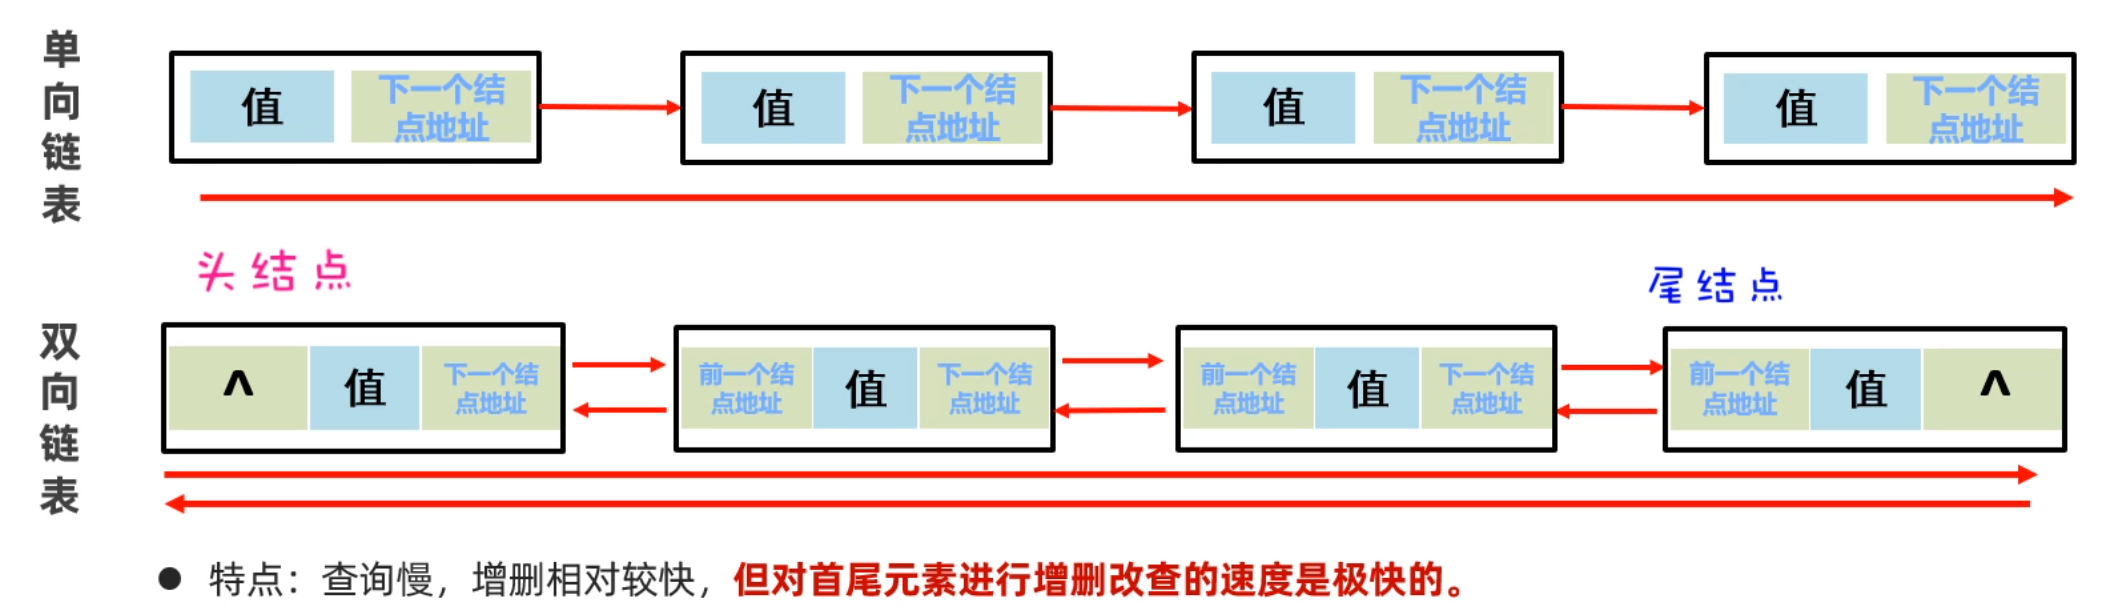
上面的链表是单向链表,它的方向是从头节点指向尾节点的,只能从左往右查找元素,这样查询效率比较慢;还有一种链表叫做双向链表,不光可以从做往右找,还可以从右往左找。如下图所示:
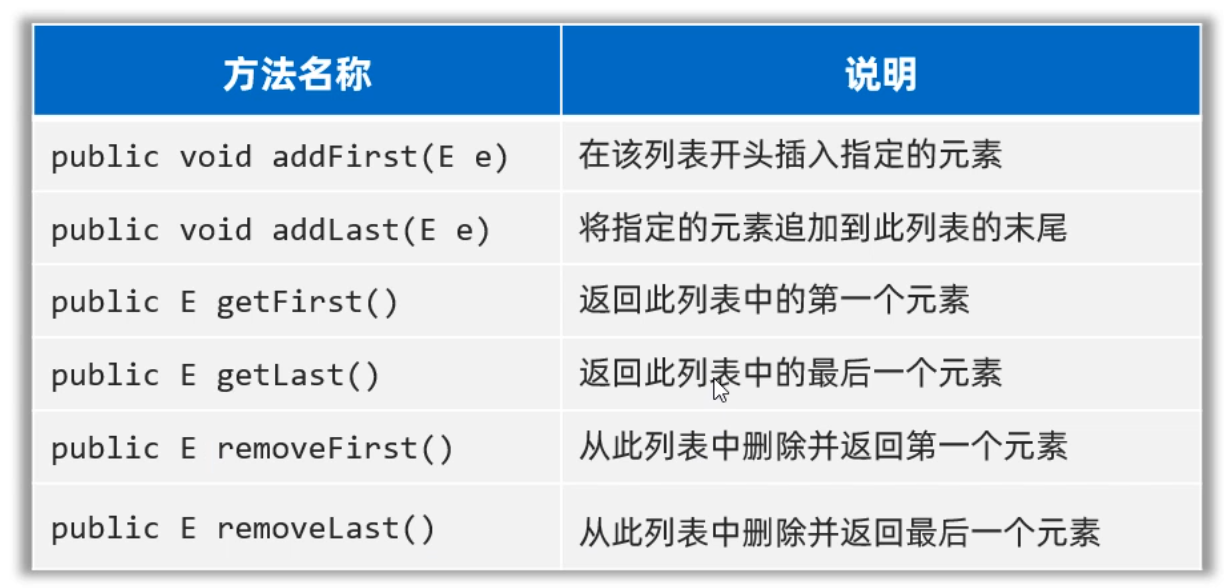
LinkedList集合是基于双向链表 实现了,所以相对于ArrayList新增了一些可以针对头尾进行操作的方法,如下图示所示:
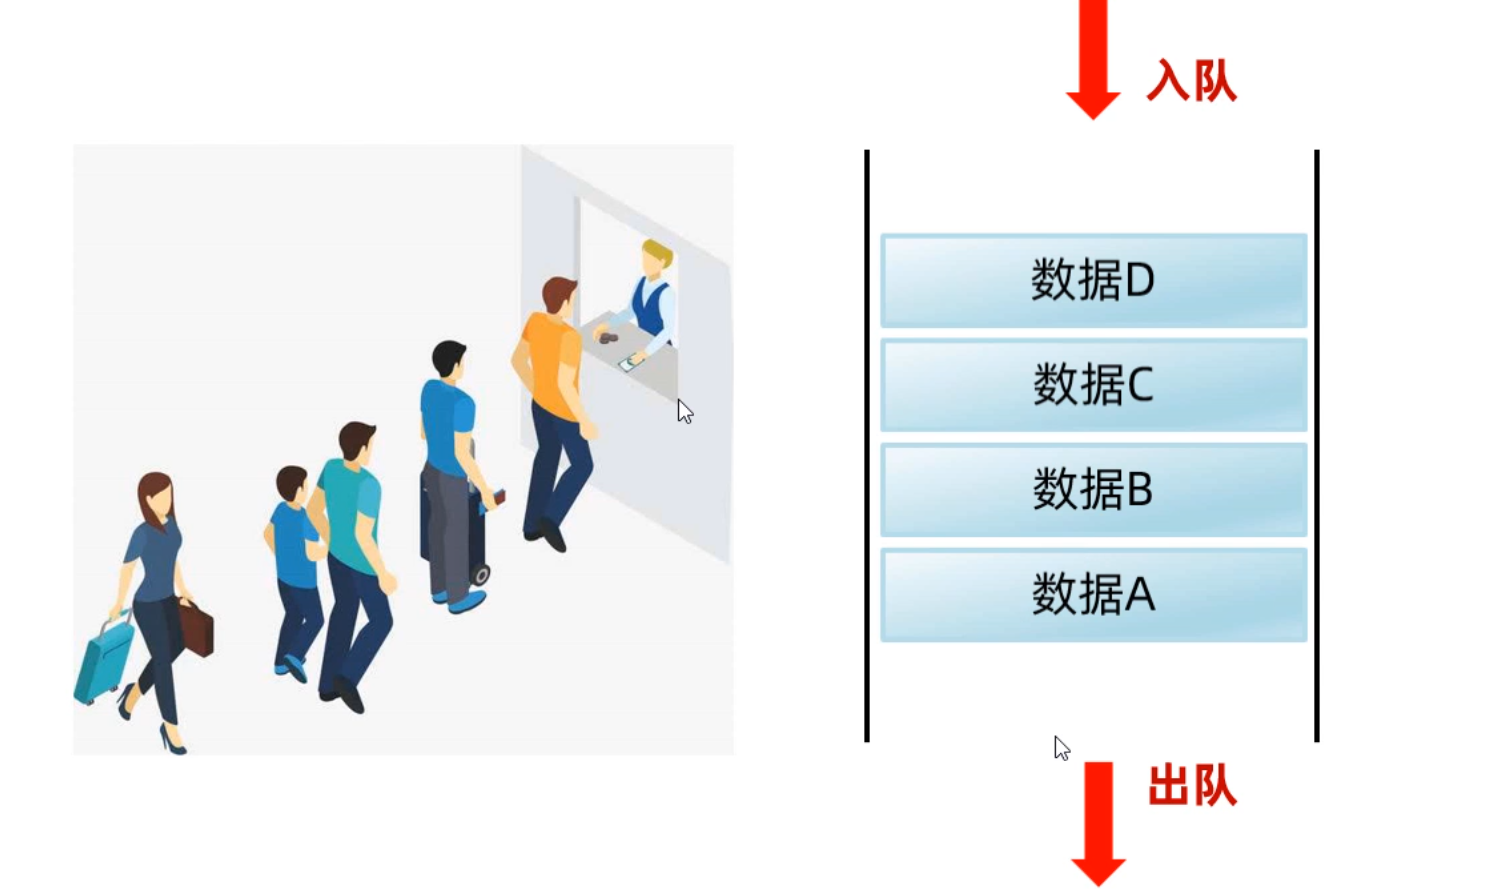
3.5 LinkedList集合的应用场景 刚才我们学习了LinkedList集合,那么LInkedList集合有什么用呢?可以用它来设计栈结构、队列结构 。
我们先来认识一下队列结构,队列结构你可以认为是一个上端开口,下端也开口的管子的形状。元素从上端入队列,从下端出队列。
入队列可以调用LinkedList集合的addLast方法,出队列可以调用removeFirst()方法.
1 2 3 4 5 6 7 8 9 10 11 12 13 14 LinkedList<String> queue = new LinkedList <>(); queue.addLast("第1号人" ); queue.addLast("第2号人" ); queue.addLast("第3号人" ); queue.addLast("第4号人" ); System.out.println(queue); System.out.println(queue.removeFirst()); System.out.println(queue.removeFirst()); System.out.println(queue.removeFirst()); System.out.println(queue.removeFirst());
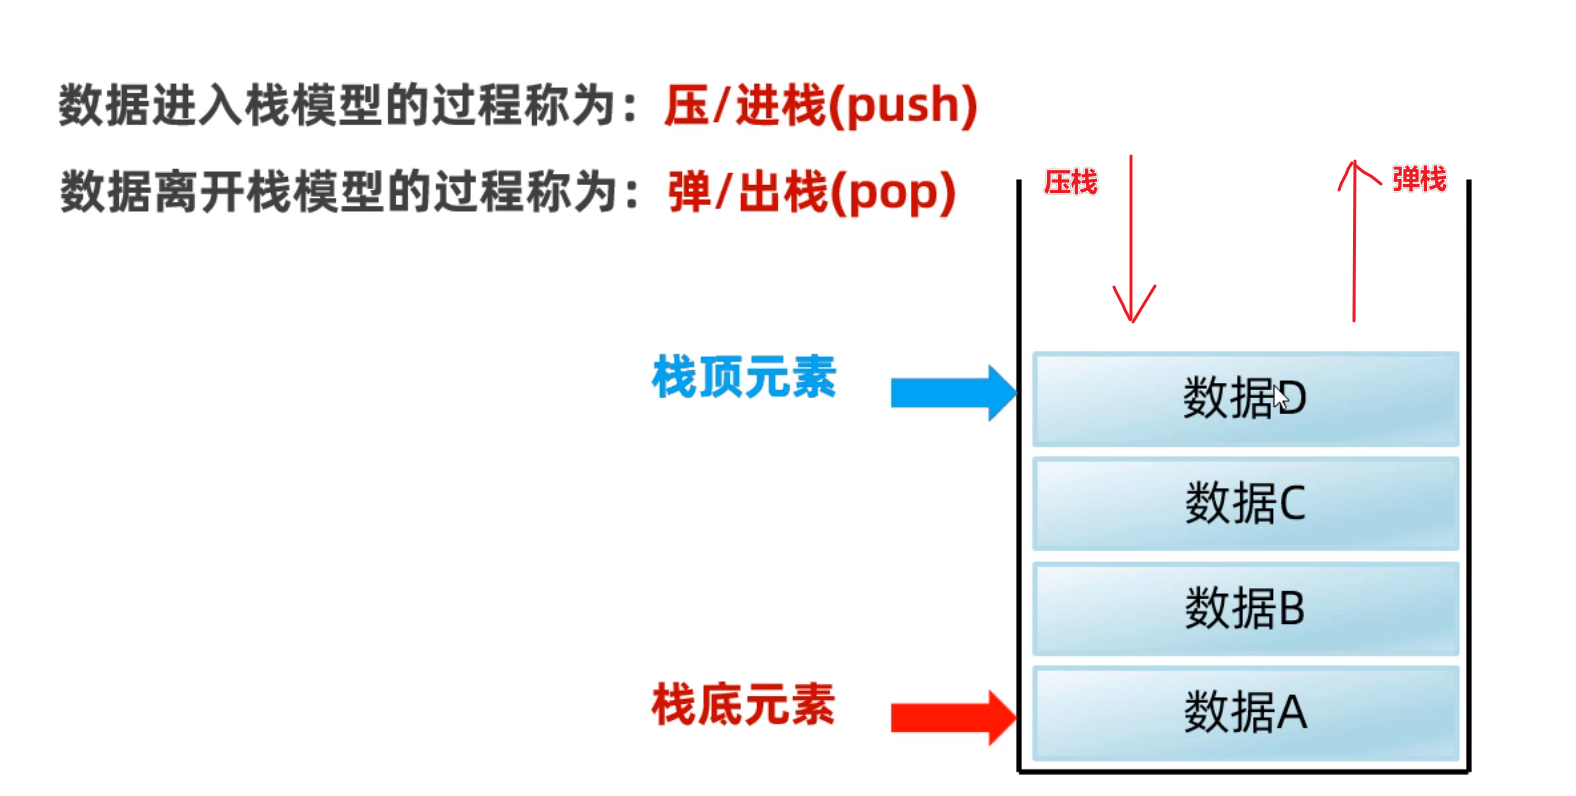
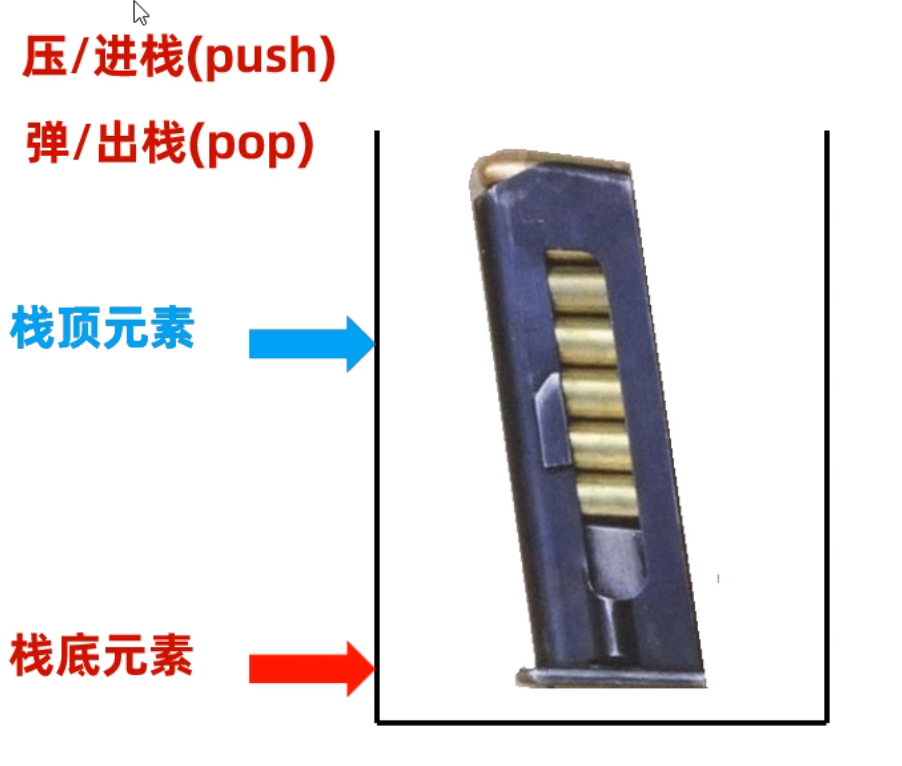
有没有感觉栈结构很像,手枪的子弹夹呀!!第一个压进入的子弹在最底下,最后一个才能打出来,最后一个压进入的子弹在最顶上,第一个打出来。
接着,我们就用LinkedList来模拟下栈结构,代码如下:
1 2 3 4 5 6 7 8 9 10 11 12 13 14 15 16 17 LinkedList<String> stack = new ArrayList <>(); stack.push("第1颗子弹" ); stack.push("第2颗子弹" ); stack.push("第3颗子弹" ); stack.push("第4颗子弹" ); System.out.println(stack); System.out.println(statck.pop()); System.out.println(statck.pop()); System.out.println(statck.pop()); System.out.println(statck.pop()); System.out.println(list);
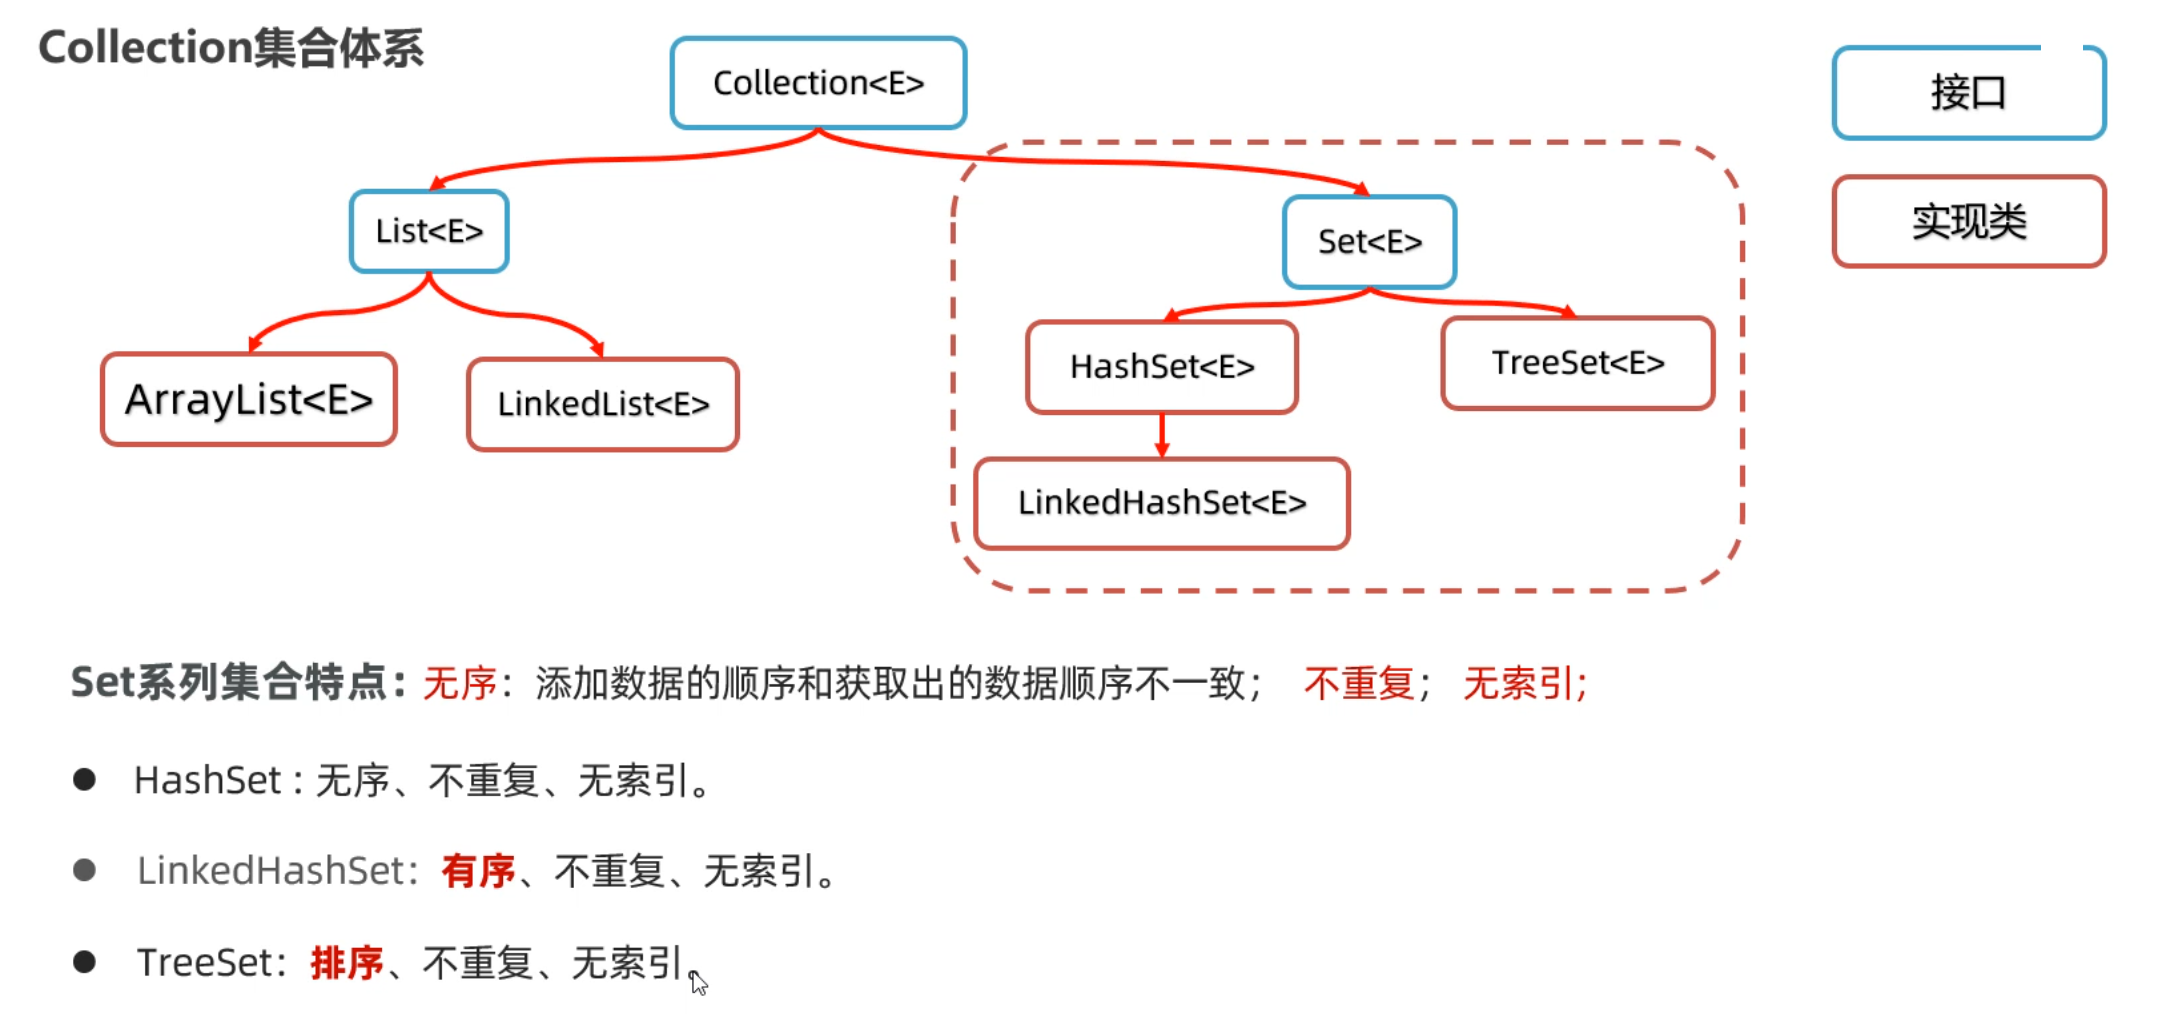
day07——集合进阶(Set、Map集合) 一、Set系列集合 1.1 认识Set集合的特点 Set集合是属于Collection体系下的另一个分支,它的特点如下图所示,全部无索引
下面我们用代码简单演示一下,每一种Set集合的特点。
1 2 3 4 5 6 7 8 9 10 11 Set<Integer> set = new TreeSet <>(); set.add(666 ); set.add(555 ); set.add(555 ); set.add(888 ); set.add(888 ); set.add(777 ); set.add(777 ); System.out.println(set);
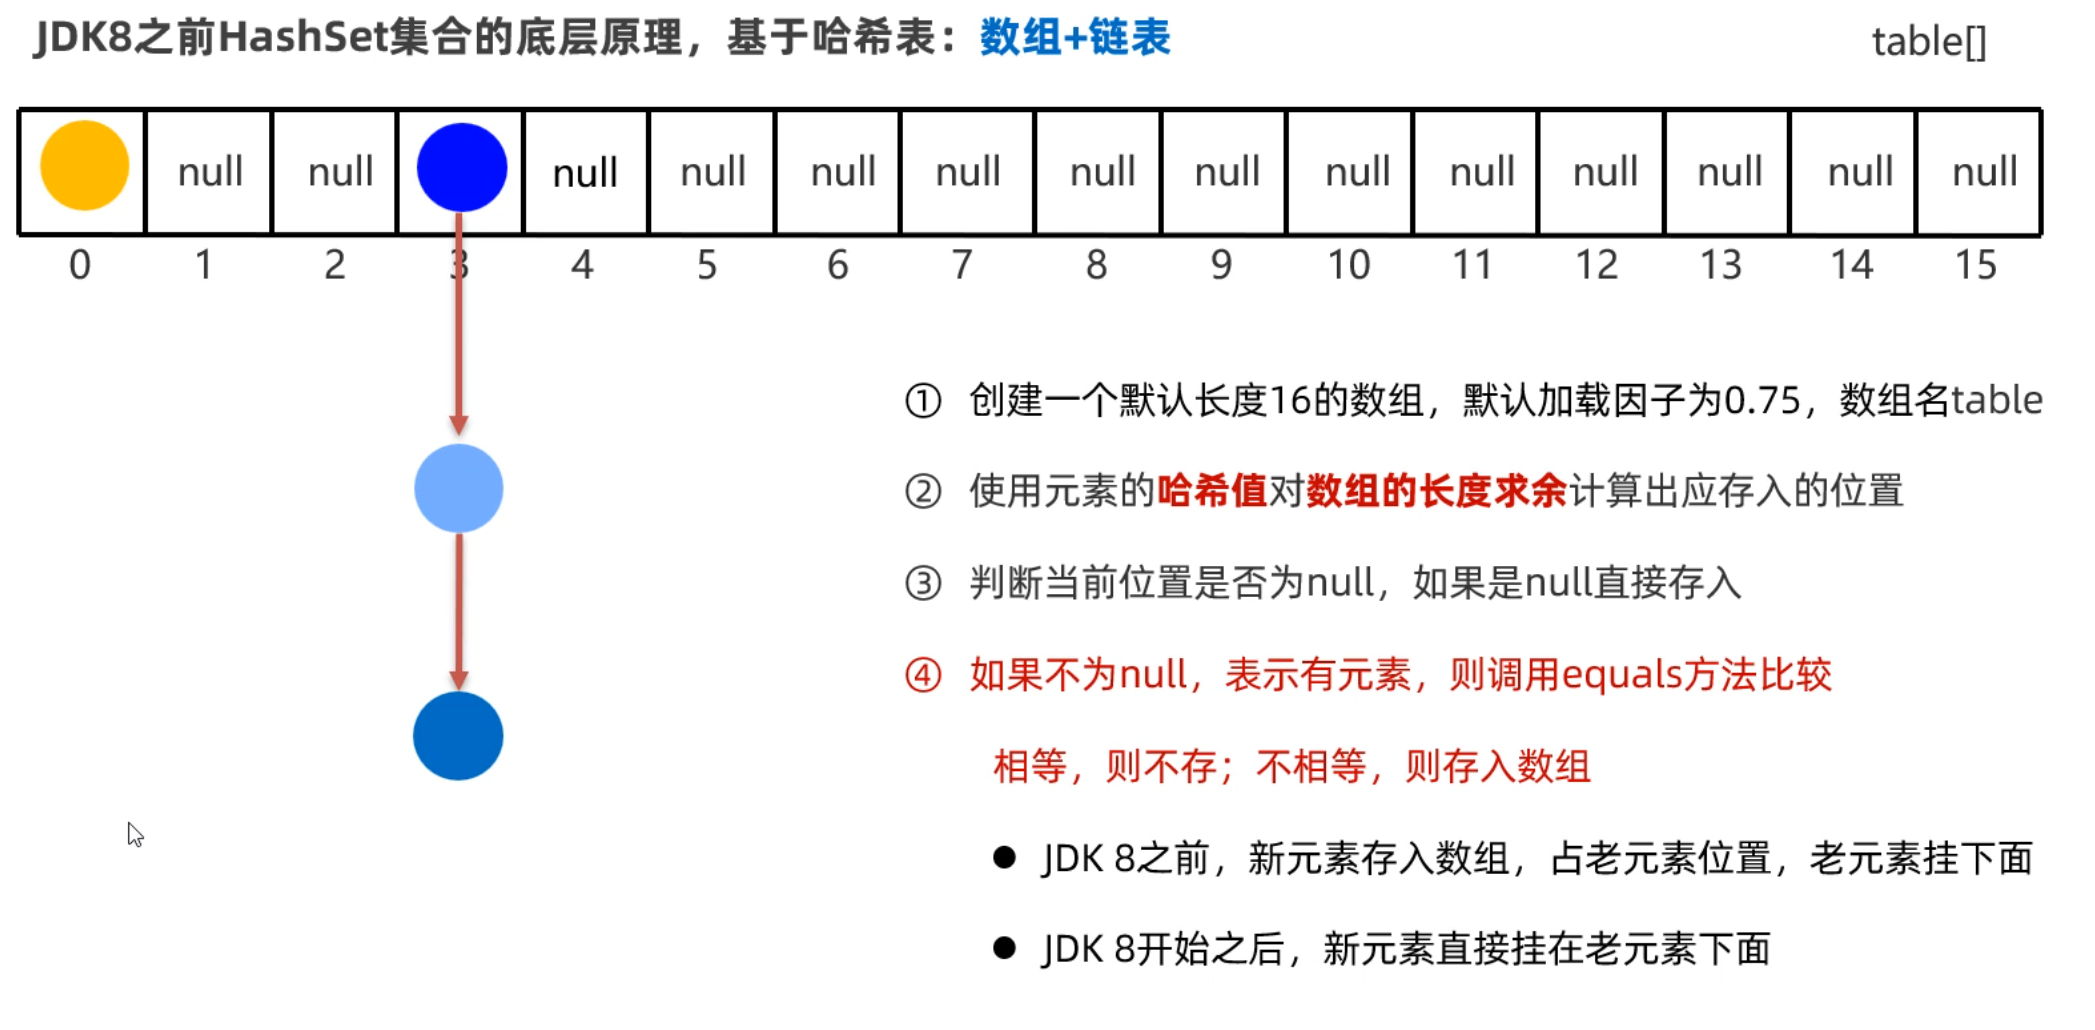
1.2 HashSet集合底层原理 接下来,为了让同学们更加透彻的理解HashSet为什么可以去重,我们来看一下它的底层原理。
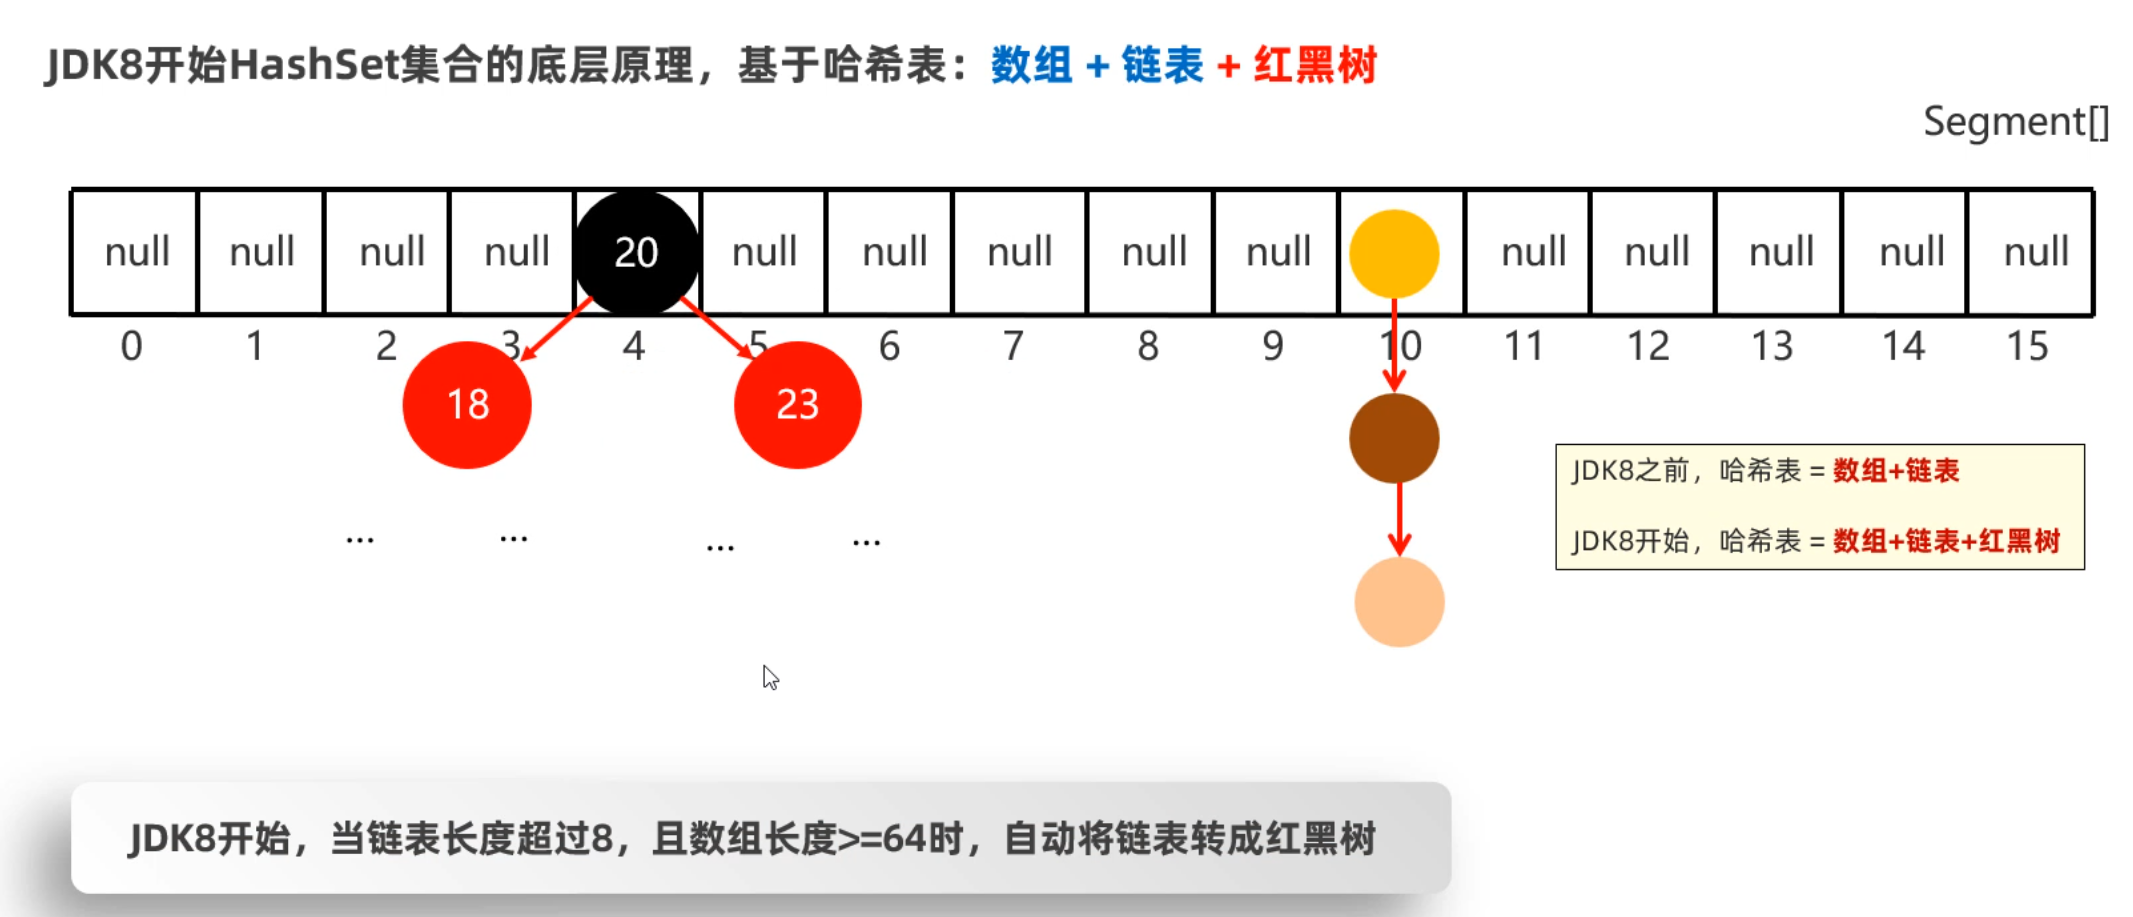
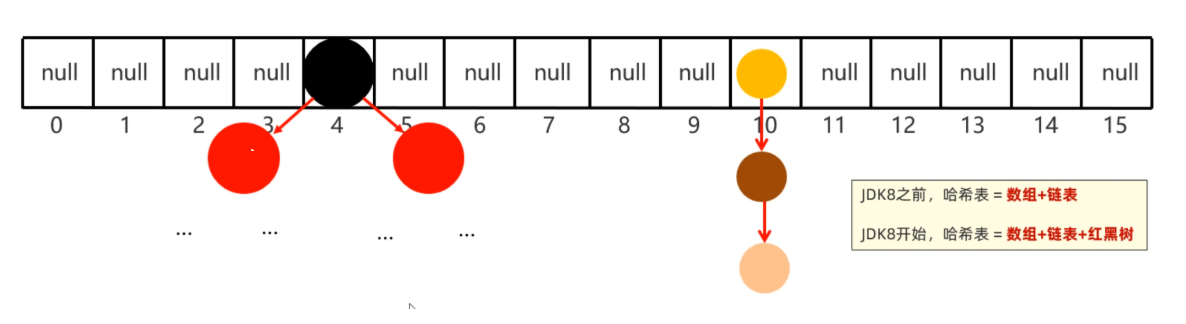
HashSet集合底层是基于哈希表实现的,哈希表根据JDK版本的不同,也是有点区别的
JDK8以前:哈希表 = 数组+链表
JDK8以后:哈希表 = 数组+链表+红黑树
我们发现往HashSet集合中存储元素时,底层调用了元素的两个方法:一个是hashCode方法获取元素的hashCode值(哈希值);另一个是调用了元素的equals方法,用来比较新添加的元素和集合中已有的元素是否相同。
只有新添加元素的hashCode值和集合中以后元素的hashCode值相同、新添加的元素调用equals方法和集合中已有元素比较结果为true, 才认为元素重复。
如果hashCode值相同,equals比较不同,则以链表的形式连接在数组的同一个索引为位置(如上图所示)
在JDK8开始后,为了提高性能,当链表的长度超过8时,就会把链表转换为红黑树 ,如下图所示:
1.3 HashSet去重原理 前面我们学习了HashSet存储元素的原理,依赖于两个方法:一个是hashCode方法用来确定在底层数组中存储的位置,另一个是用equals方法判断新添加的元素是否和集合中已有的元素相同。
要想保证在HashSet集合中没有重复元素,我们需要重写元素类的hashCode和equals方法。比如以下面的Student类为例,假设把Student类的对象作为HashSet集合的元素,想要让学生的姓名和年龄相同,就认为元素重复。
HashSet可以初始化的时候就传入别的list参数,直接转变为set
1
2
List<String> wordDict = new List <>; HashSet<String> set = new HashSet <>(wordDict);
HashSet方法
1
2
3
4
public boolean add (E e) public boolean remove (Object o) public void clear () public Object clone ()
1
2
3
4
5
6
7
8
9
10
11
12
13
14
15
16
17
18
19
20
21
22
23
24
25
26
27
28
29
30
31
32
33
34
35
36
37
38
39
40
public class Student { private String name; private int age; private double height; public Student () {} public Student (String name, int age, double height) { this .name=name; this .age=age; this .height=height; } @Override public boolean equals (Object o) { if (this == o) return true ; if (o == null || getClass() != o.getClass()) return false ; Student student = (Student) o; if (age != student.age) return false ; if (Double.compare(student.height, height) != 0 ) return false ; return name != null ? name.equals(student.name) : student.name == null ; } @Override public int hashCode () { int result; long temp; result = name != null ? name.hashCode() : 0 ; result = 31 * result + age; temp = Double.doubleToLongBits(height); result = 31 * result + (int ) (temp ^ (temp >>> 32 )); return result; } }
接着,写一个测试类,往HashSet集合中存储Student对象。
1
2
3
4
5
6
7
8
9
10
11
12
13
14
15
16
17
18
public class Test { public static void main (String[] args) { Set<Student> students = new HashSet <>(); Student s1 = new Student ("至尊宝" ,20 , 169.6 ); Student s2 = new Student ("蜘蛛精" ,23 , 169.6 ); Student s3 = new Student ("蜘蛛精" ,23 , 169.6 ); Student s4 = new Student ("牛魔王" ,48 , 169.6 ); students.add(s1); students.add(s2); students.add(s3); students.add(s4); for (Student s : students){ System.out.println(s); } } }
打印结果如下,我们发现存了两个蜘蛛精,当时实际打印出来只有一个,而且是无序的。
1 2 3 Student{name='牛魔王' , age=48 , height=169.6 } Student{name='至尊宝' , age=20 , height=169.6 } Student{name='蜘蛛精' , age=23 , height=169.6 }
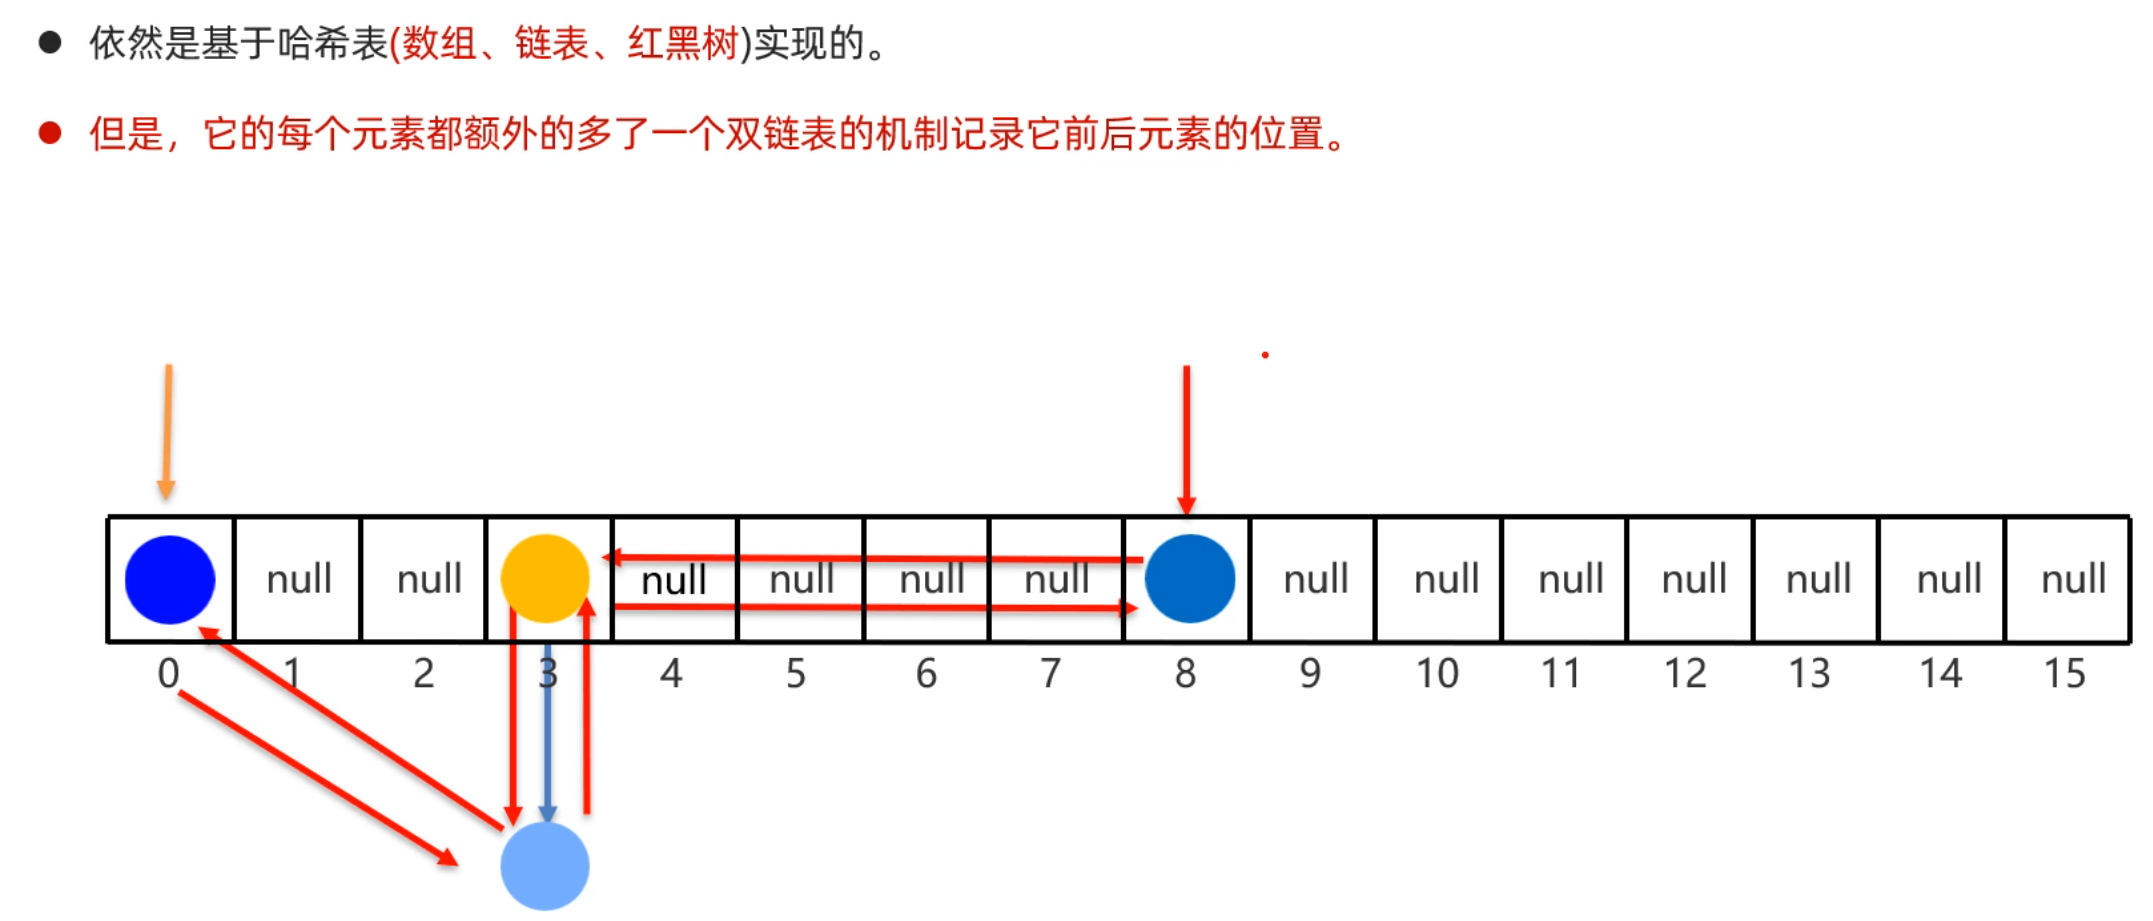
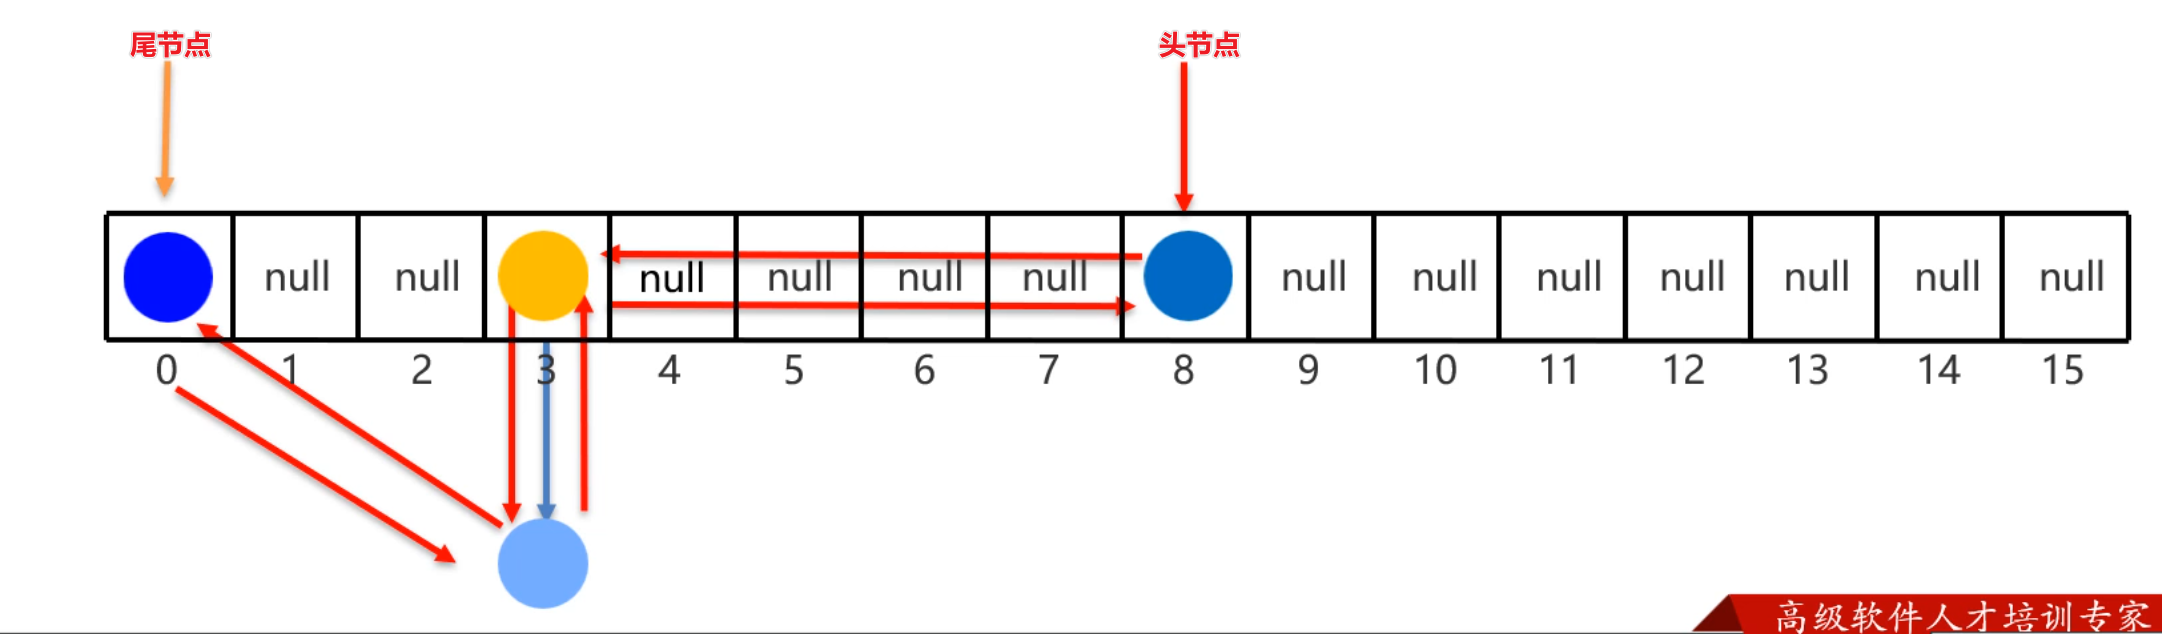
1.4 LinkedHashSet底层原理 接下来,我们再学习一个HashSet的子类LinkedHashSet类。LinkedHashSet它底层采用的是也是哈希表结构,只不过额外新增了一个双向链表来维护元素的存取顺序。如下下图所示:
每次添加元素,就和上一个元素用双向链表连接一下。第一个添加的元素是双向链表的头节点,最后一个添加的元素是双向链表的尾节点。
把上个案例中的集合改成LinkedList集合,我们观察效果怎样
1
2
3
4
5
6
7
8
9
10
11
12
13
14
15
16
17
18
public class Test { public static void main (String[] args) { Set<Student> students = new LinkedHashSet <>(); Student s1 = new Student ("至尊宝" ,20 , 169.6 ); Student s2 = new Student ("蜘蛛精" ,23 , 169.6 ); Student s3 = new Student ("蜘蛛精" ,23 , 169.6 ); Student s4 = new Student ("牛魔王" ,48 , 169.6 ); students.add(s1); students.add(s2); students.add(s3); students.add(s4); for (Student s : students){ System.out.println(s); } } }
打印结果如下
1 2 3 Student{name='至尊宝' , age=20 , height=169.6 } Student{name='蜘蛛精' , age=23 , height=169.6 } Student{name='牛魔王' , age=48 , height=169.6 }
1.5 TreeSet集合 最后,我们学习一下TreeSet集合。TreeSet集合的特点是可以对元素进行排序,但是必须指定元素的排序规则。
如果往集合中存储String类型的元素,或者Integer类型的元素,它们本身就具备排序规则,所以直接就可以排序。
1
2
3
4
5
6
7
8
9
10
11
12
13
14
15
16
17
18
19
20
Set<Integer> set1= new TreeSet <>(); set1.add(8 ); set1.add(6 ); set1.add(4 ); set1.add(3 ); set1.add(7 ); set1.add(1 ); set1.add(5 ); set1.add(2 ); System.out.println(set1); Set<Integer> set2= new TreeSet <>(); set2.add("a" ); set2.add("c" ); set2.add("e" ); set2.add("b" ); set2.add("d" ); set2.add("f" ); set2.add("g" ); System.out.println(set1);
如果往TreeSet集合中存储自定义类型的元素,比如说Student类型,则需要我们自己指定排序规则,否则会出现异常。
1 2 3 4 5 6 7 8 9 10 11 12 13 14 15 Set<Student> students = new TreeSet <>(); Student s1 = new Student ("至尊宝" ,20 , 169.6 );Student s2 = new Student ("紫霞" ,23 , 169.8 );Student s3 = new Student ("蜘蛛精" ,23 , 169.6 );Student s4 = new Student ("牛魔王" ,48 , 169.6 );students.add(s1); students.add(s2); students.add(s3); students.add(s4); System.out.println(students);
此时运行代码,会直接报错。原因是TreeSet不知道按照什么条件对Student对象来排序。
我们想要告诉TreeSet集合按照指定的规则排序,有两种办法:
第一种:让元素的类实现Comparable接口,重写compareTo方法
第二种:在创建TreeSet集合时,通过构造方法传递Compartor比较器对象
1 2 3 4 5 6 7 8 9 10 11 12 13 14 15 16 17 18 19 20 21 22 23 24 25 26 27 28 29 30 public class Student implements Comparable <Student>{ private String name; private int age; private double height; public Student () {} public Student (String name, int age, double height) { this .name=name; this .age=age; this .height=height; } @Override public int compareTo (Student o) { return this .age-o.age; } }
此时,再运行测试类,结果如下
1 2 3 4 Student{name='至尊宝' , age=20 , height=169.6 } Student{name='紫霞' , age=20 , height=169.8 } Student{name='蜘蛛精' , age=23 , height=169.6 } Student{name='牛魔王' , age=48 , height=169.6 }
1 2 3 4 5 6 7 8 9 10 11 12 13 14 15 16 17 18 19 20 21 22 23 24 25 Set<Student> students = new TreeSet <>(new Comparator <Student>{ @Override public int compare (Student o1, Student o2) { return Double.compare(o1,o2); } }); Student s1 = new Student ("至尊宝" ,20 , 169.6 );Student s2 = new Student ("紫霞" ,23 , 169.8 );Student s3 = new Student ("蜘蛛精" ,23 , 169.6 );Student s4 = new Student ("牛魔王" ,48 , 169.6 );students.add(s1); students.add(s2); students.add(s3); students.add(s4); System.out.println(students);
1.6 总结Collection集合 最后,将所有的Collection集合总结一下,要求大家掌握每一种集合的特点,以及他们的体系结构。
好了,关于Collection集合,到这里就学习完了。
1.7 并发修改异常 学完Collection集合后,还有一个小问题需要给同学们补充说明一下,那就是在使用迭代器遍历集合时,可能存在并发修改异常。
我们先把这个异常用代码演示出来,再解释一下为什么会有这个异常产生
1
2
3
4
5
6
7
8
9
10
11
12
13
14
15
16
17
18
List<String> list = new ArrayList <>(); list.add("王麻子" ); list.add("小李子" ); list.add("李爱花" ); list.add("张全蛋" ); list.add("晓李" ); list.add("李玉刚" ); System.out.println(list); Iterator<String> it = list.iterator(); while (it.hasNext()){ String name = it.next(); if (name.contains("李" )){ list.remove(name); } } System.out.println(list);
运行上面的代码,会出现下面的异常。这就是并发修改异常
为什么会出现这个异常呢?那是因为迭代器遍历机制,规定迭代器遍历集合的同时,不允许集合自己去增删元素 ,否则就会出现这个异常。
怎么解决这个问题呢?不使用集合的删除方法,而是使用迭代器的删除方法,代码如下:
1
2
3
4
5
6
7
8
9
10
11
12
13
14
15
16
17
18
19
List<String> list = new ArrayList <>(); list.add("王麻子" ); list.add("小李子" ); list.add("李爱花" ); list.add("张全蛋" ); list.add("晓李" ); list.add("李玉刚" ); System.out.println(list); Iterator<String> it = list.iterator(); while (it.hasNext()){ String name = it.next(); if (name.contains("李" )){ it.remove(); } } System.out.println(list);
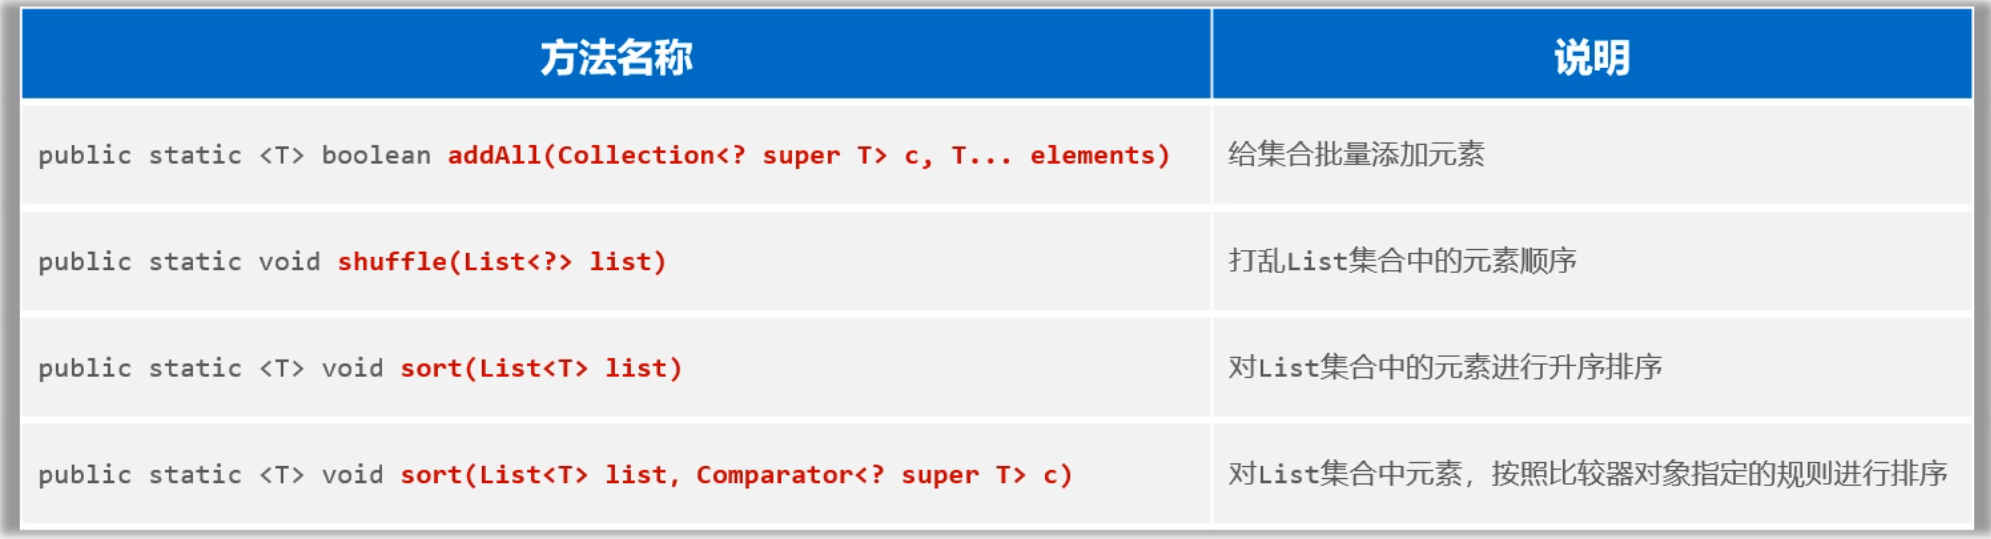
二、Collection的其他操作 各位同学,前面我们已经把Collection家族的集合都学习完了。为了更加方便的对Collection集合进行操作,今天我们还要学习一个操作Collection集合的工具类,叫做Collections。但是Collections工具类中需要用到一个没有学过的小知识点,叫做可变参数,所以必须先学习这个前置知识可变参数,再学习Collections工具类,最后再利用这个工具类做一个综合案例。
2.1 可变参数 首先,我们来学习一下可变参数。关于可变参数我们首先要知道它是什么,然后要知道它的本质。搞清楚这两个问题,可变参数就算你学明白了。
接下来,我们编写代码来演示一下
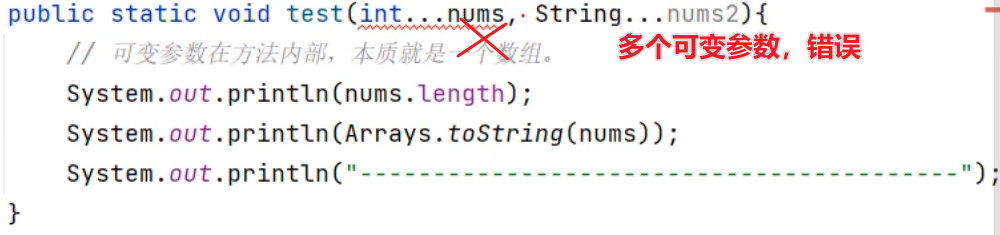
1
2
3
4
5
6
7
8
9
10
11
12
13
14
15
16
17
18
19
20
public class ParamTest { public static void main (String[] args) { test(); test(10 ,20 ,30 ); int [] arr = new int []{10 ,20 ,30 ,40 } test(arr); } public static void test (int ...nums) { System.out.println(nums.length); System.out.println(Arrays.toString(nums)); System.out.println("----------------" ); } }
最后还有一些错误写法,需要让大家写代码时注意一下,不要这么写哦!!!
2.2 Collections工具类 有了可变参数的基础,我们再学习Collections这个工具类就好理解了,因为这个工具类的方法中会用到可变参数。
注意Collections并不是集合,它比Collection多了一个s,一般后缀为s的类很多都是工具类。这里的Collections是用来操作Collection的工具类。它提供了一些好用的静态方法,如下
1 Collections.reverse(arraylist);
我们把这些方法用代码来演示一下:
1
2
3
4
5
6
7
8
9
10
11
12
13
14
15
16
17
18
19
20
public class CollectionsTest { public static void main (String[] args) { List<String> names = new ArrayList <>(); Collections.addAll(names, "张三" ,"王五" ,"李四" , "张麻子" ); System.out.println(names); Collections.shuffle(names); System.out.println(names); List<Integer> list = new ArrayList <>(); list.add(3 ); list.add(5 ); list.add(2 ); Collections.sort(list); System.out.println(list); } }
上面我们往集合中存储的元素要么是Stirng类型,要么是Integer类型,他们本来就有一种自然顺序所以可以直接排序。但是如果我们往List集合中存储Student对象,这个时候想要对List集合进行排序自定义比较规则的。指定排序规则有两种方式,如下:
排序方式1:让元素实现Comparable接口,重写compareTo方法
比如现在想要往集合中存储Student对象,首先需要准备一个Student类,实现Comparable接口。
1
2
3
4
5
6
7
8
9
10
11
12
13
14
15
16
17
public class Student implements Comparable <Student>{ private String name; private int age; private double height; @Override public int compareTo (Student o) { return this .age - o.age; } }
然后再使用Collections.sort(list集合)对List集合排序,如下:
1 2 3 4 5 6 7 8 9 10 11 12 13 14 15 16 List<Student> students = new ArrayList <>(); students.add(new Student ("蜘蛛精" ,23 ,169.7 )); students.add(new Student ("紫霞" ,22 ,169.8 )); students.add(new Student ("紫霞" ,22 ,169.8 )); students.add(new Student ("至尊宝" ,26 ,169.5 )); Collections.sort(students); System.out.println(students);
排序方式2:使用调用sort方法是,传递比较器
1 2 3 4 5 6 7 8 9 10 11 12 13 14 Collections.sort(students, new Comparator <Student>(){ @Override public int compare (Student o1, Student o2) { return o1.getAge()-o2.getAge(); } }); System.out.println(students);
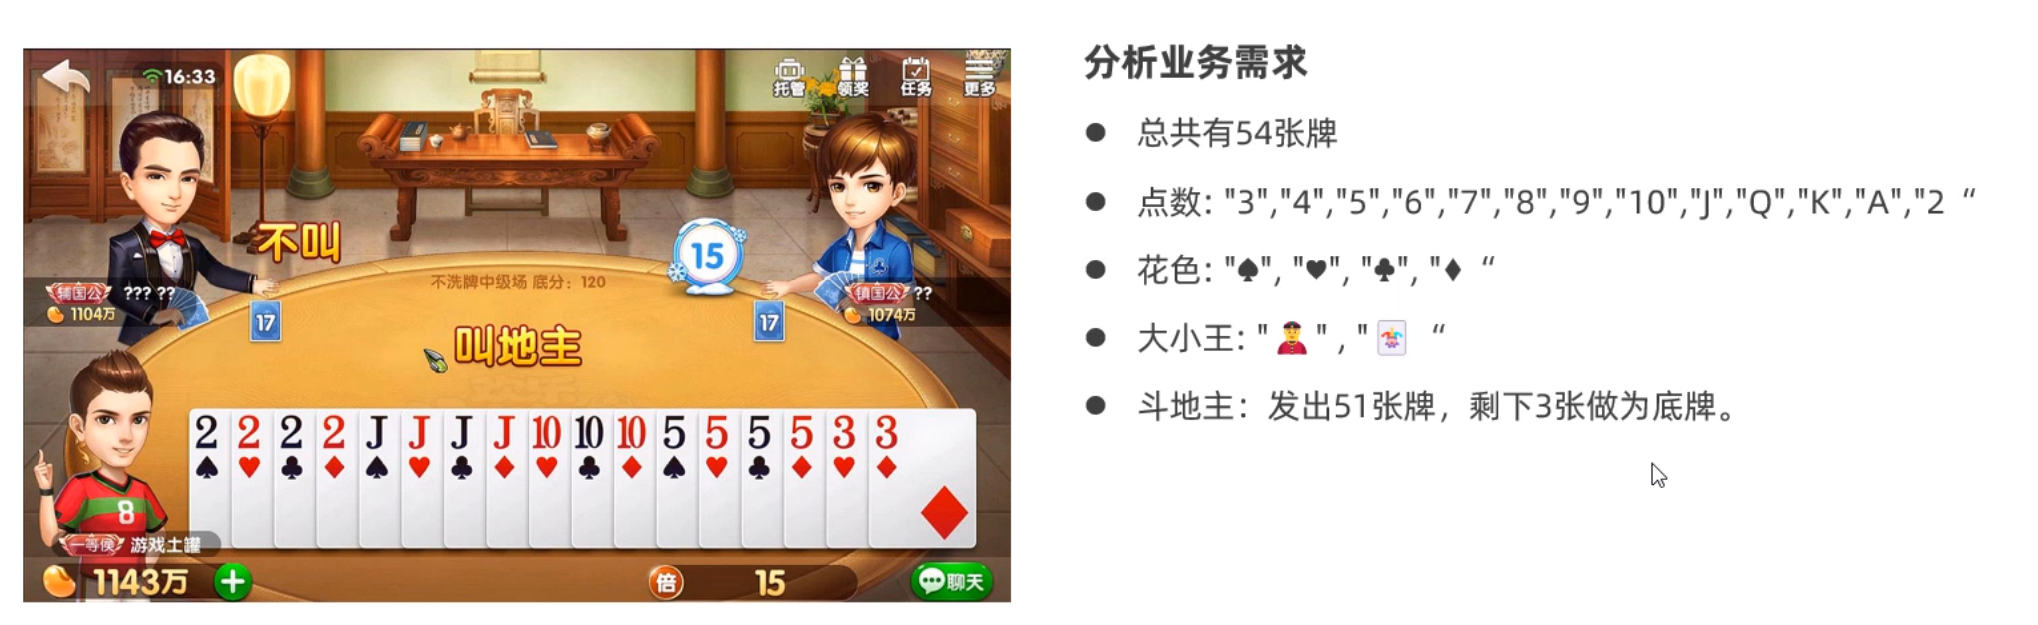
2.3 斗地主案例
我们先分析一下业务需求:
总共有54张牌,每一张牌有花色和点数两个属性、为了排序还可以再加一个序号
点数可以是:“3”,"4","5","6","7","8","9","10","J","Q","K","A","2"
花色可以是:“♣”,"♠","♥","♦"
斗地主时:三个玩家没人手里17张牌,剩余3张牌作为底牌
1
2
3
第一步:为了表示每一张牌有哪些属性,首先应该新建一个扑克牌的类 第二步:启动游戏时,就应该提前准备好54 张牌 第三步:接着再完全洗牌、发牌、捋牌、看牌的业务逻辑
先来完成第一步,定义一个扑克类Card
1
2
3
4
5
6
7
8
9
10
11
12
13
14
15
16
17
18
19
20
21
22
23
24
25
26
27
28
29
30
31
32
33
34
35
36
37
38
39
40
41
42
43
44
public class Card { private String number; private String color; private int size; public Card () { } public Card (String number, String color, int size) { this .number = number; this .color = color; this .size = size; } public String getNumber () { return number; } public void setNumber (String number) { this .number = number; } public String getColor () { return color; } public void setColor (String color) { this .color = color; } public int getSize () { return size; } public void setSize (int size) { this .size = size; } @Override public String toString () { return color + number ; } }
再完成第二步,定义一个房间类,初始化房间时准备好54张牌
1
2
3
4
5
6
7
8
9
10
11
12
13
14
15
16
17
18
19
20
21
22
23
24
25
26
27
28
public class Room { private List<Card> allCards = new ArrayList <>(); public Room () { String[] numbers = {"3" ,"4" ,"5" ,"6" ,"7" ,"8" ,"9" ,"10" ,"J" ,"Q" ,"K" ,"A" ,"2" }; String[] colors = {"♠" , "♥" , "♣" , "♦" }; int size = 0 ; for (String number : numbers) { size++; for (String color : colors) { Card c = new Card (number, color, size); allCards.add(c); } } Card c1 = new Card ("" , "🃏" , ++size); Card c2 = new Card ("" , "👲" , ++size); Collections.addAll(allCards, c1, c2); System.out.println("新牌:" + allCards); } }
最后完成第三步,定义一个启动游戏的方法,完成洗牌、发牌、捋牌、看牌的业务逻辑
1 2 3 4 5 6 7 8 9 10 11 12 13 14 15 16 17 18 19 20 21 22 23 24 25 26 27 28 29 30 31 32 33 34 35 36 37 38 39 40 41 42 43 44 45 46 47 48 49 50 51 52 53 54 55 56 57 58 public void start () { Collections.shuffle(allCards); System.out.println("洗牌后:" + allCards); List<Card> linHuChong = new ArrayList <>(); List<Card> jiuMoZhi = new ArrayList <>(); List<Card> renYingYing = new ArrayList <>(); for (int i = 0 ; i < allCards.size() - 3 ; i++) { Card c = allCards.get(i); if (i % 3 == 0 ){ linHuChong.add(c); }else if (i % 3 == 1 ){ jiuMoZhi.add(c); }else if (i % 3 == 2 ){ renYingYing.add(c); } } sortCards(linHuChong); sortCards(jiuMoZhi); sortCards(renYingYing); System.out.println("啊冲:" + linHuChong); System.out.println("啊鸠:" + jiuMoZhi); System.out.println("盈盈:" + renYingYing); List<Card> lastThreeCards = allCards.subList(allCards.size() - 3 , allCards.size()); System.out.println("底牌:" + lastThreeCards); jiuMoZhi.addAll(lastThreeCards); sortCards(jiuMoZhi); System.out.println("啊鸠抢到地主后:" + jiuMoZhi); } private void sortCards (List<Card> cards) { Collections.sort(cards, new Comparator <Card>() { @Override public int compare (Card o1, Card o2) { return o2.getSize() - o1.getSize(); } }); }
不要忘记了写测试类了,
1
2
3
4
5
6
7
8
9
public class GameDemo { public static void main (String[] args) { Room m = new Room (); m.start(); } }
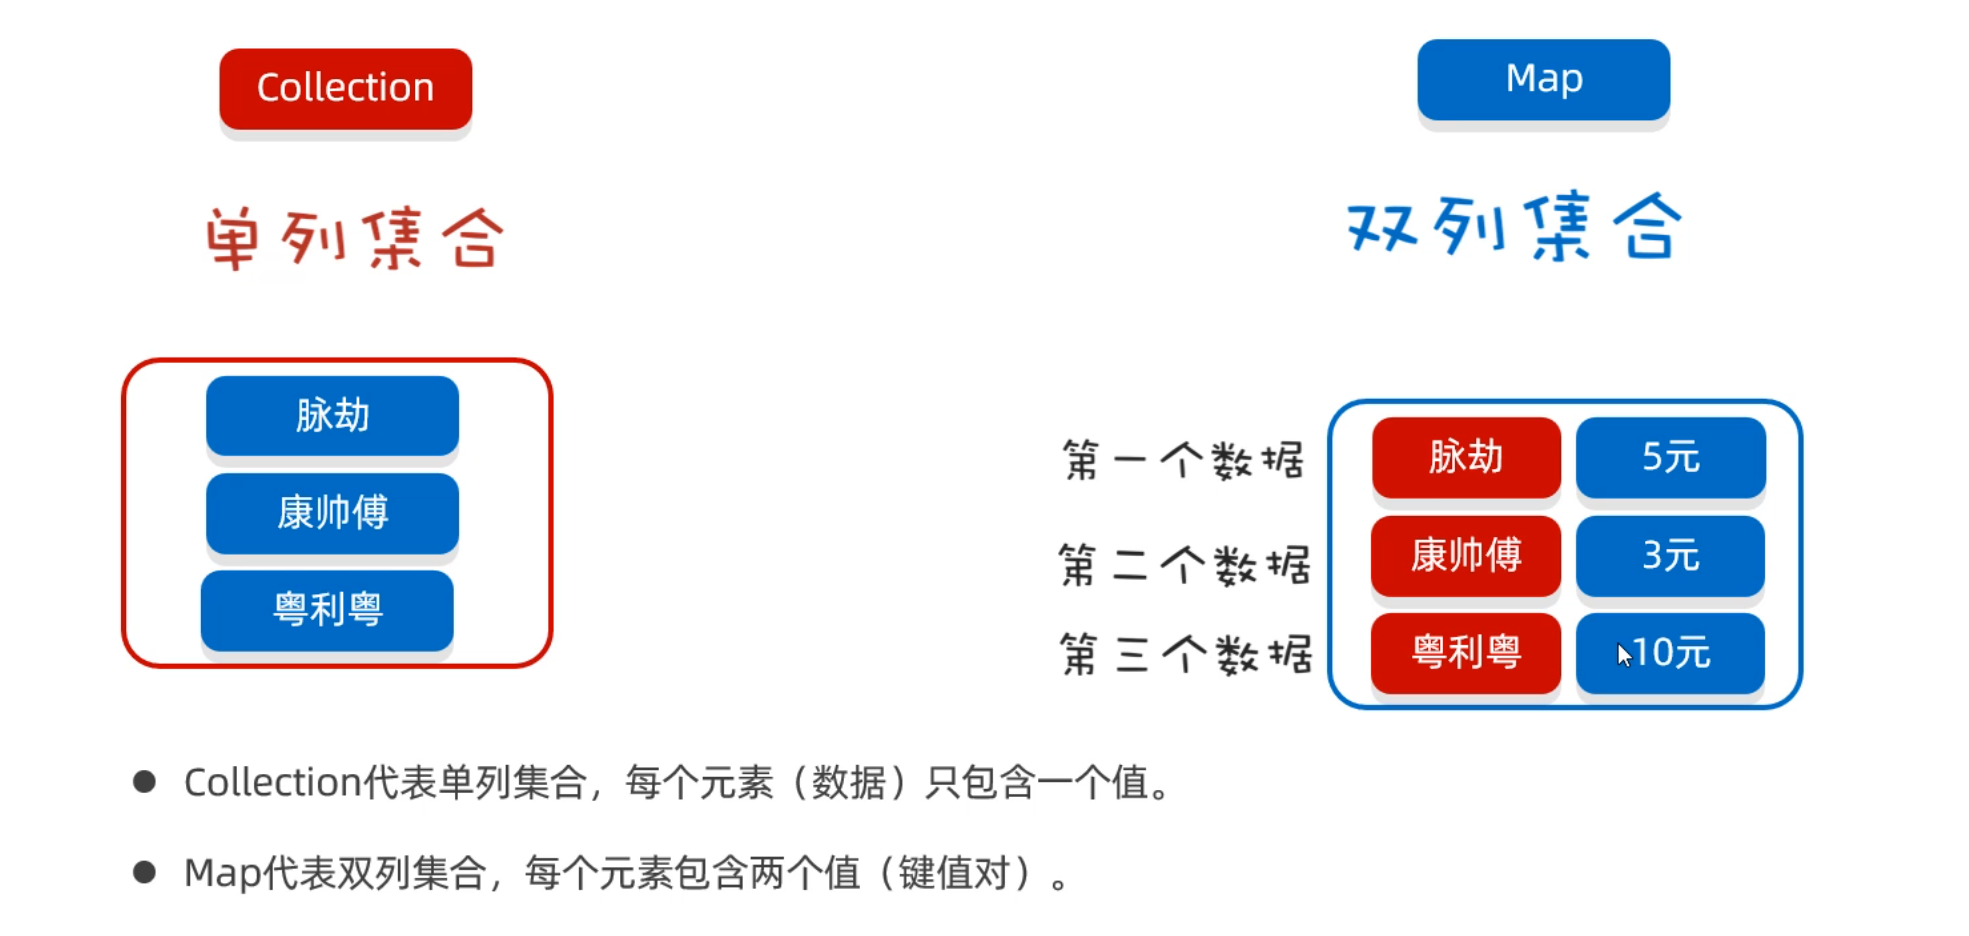
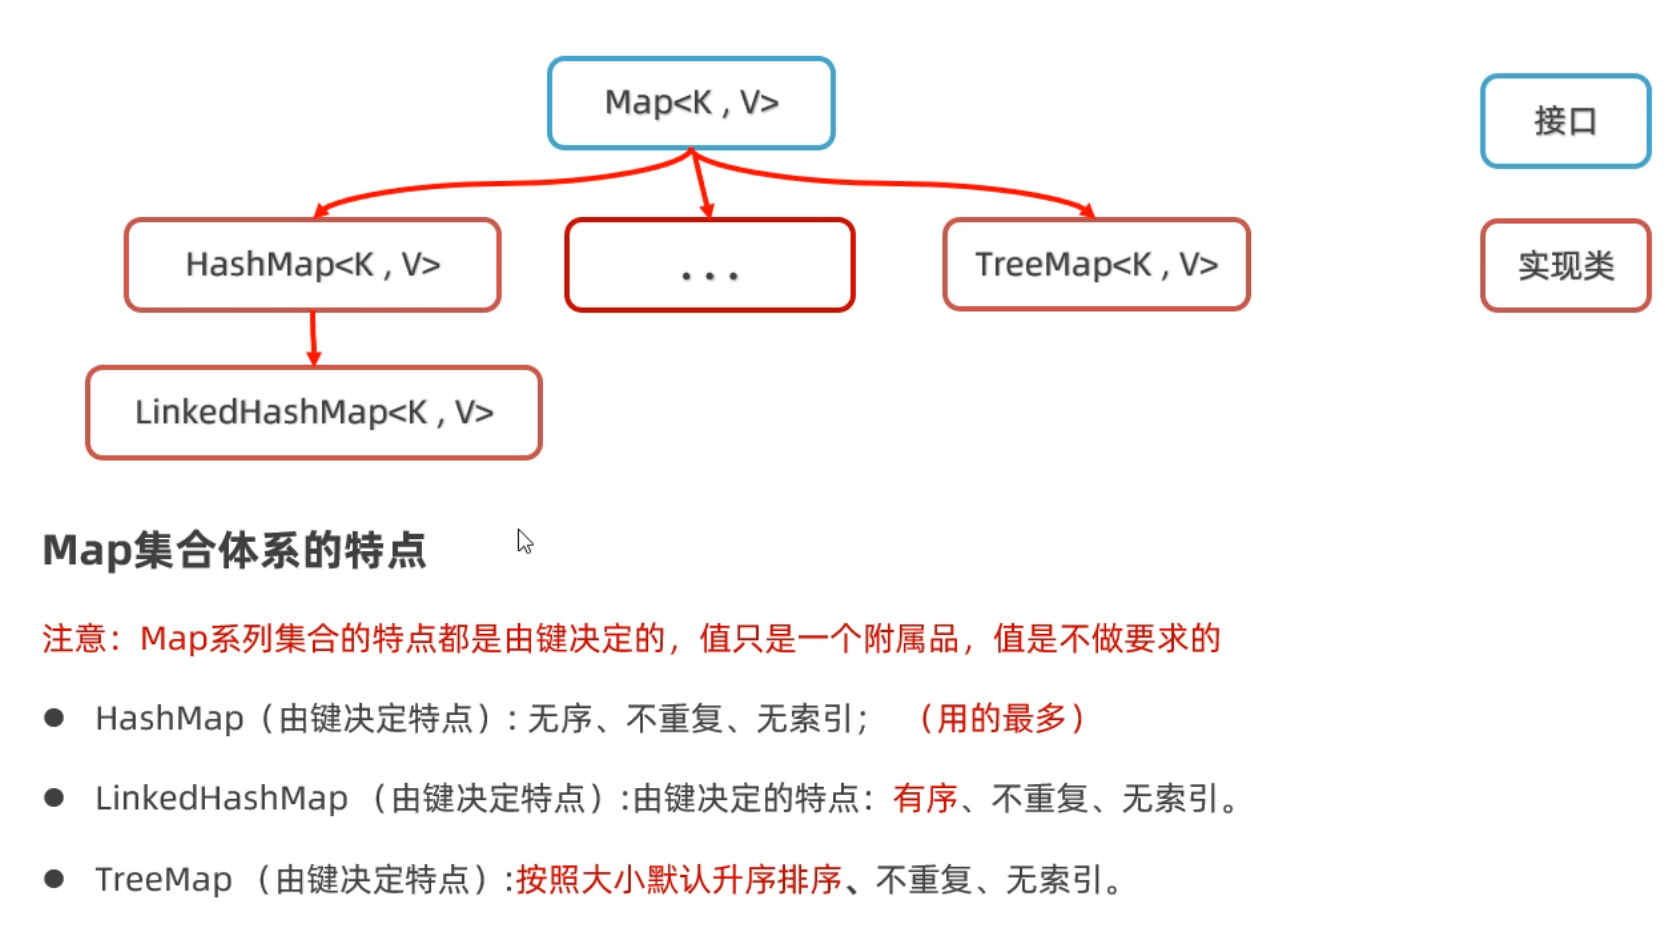
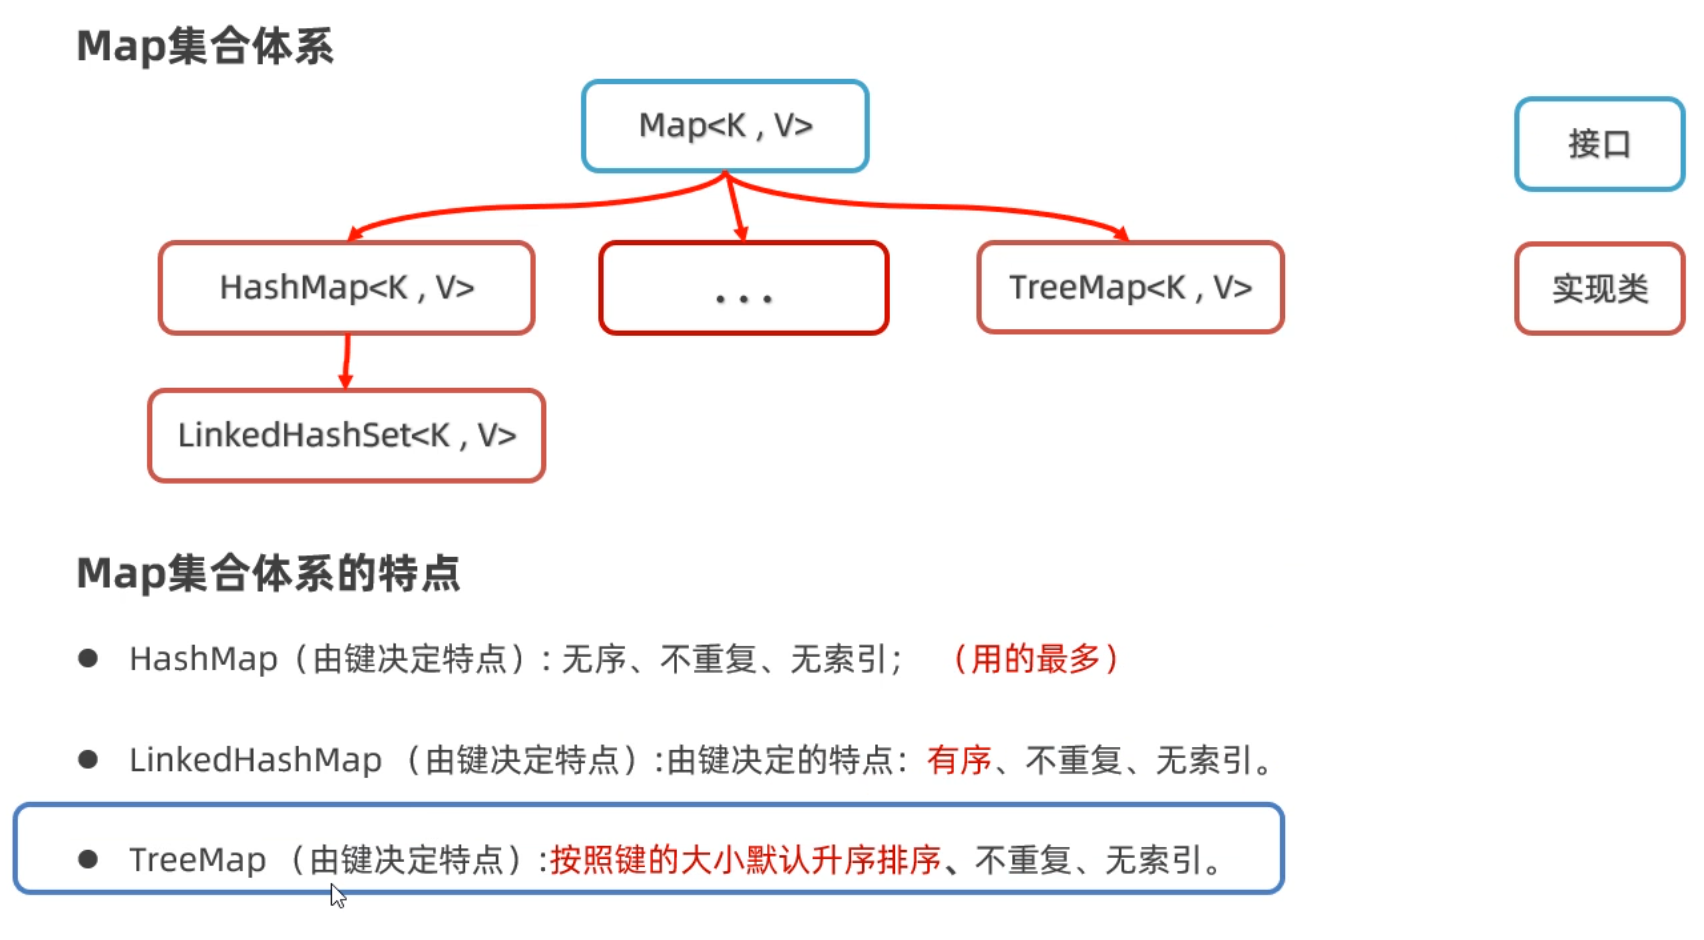
三、Map集合 3.1 Map概述体系 各位同学,前面我们已经把单列集合学习完了,接下来我们要学习的是双列集合。首先我们还是先认识一下什么是双列集合。
所谓双列集合,就是说集合中的元素是一对一对的。Map集合中的每一个元素是以key=value的形式存在的,一个key=value就称之为一个键值对,而且在Java中有一个类叫Entry类,Entry的对象用来表示键值对对象。
所有的Map集合有如下的特点:键不能重复,值可以重复,每一个键只能找到自己对应的值。
下面我们先写一个Map集合,保存几个键值对,体验一下Map集合的特点
1
2
3
4
5
6
7
8
9
10
11
12
13
14
15
16
17
18
19
public class MapTest1 { public static void main (String[] args) { Map<String, Integer> map = new LinkedHashMap <>(); map.put("手表" , 100 ); map.put("手表" , 220 ); map.put("手机" , 2 ); map.put("Java" , 2 ); map.put(null , null ); System.out.println(map); Map<Integer, String> map1 = new TreeMap <>(); map1.put(23 , "Java" ); map1.put(23 , "MySQL" ); map1.put(19 , "李四" ); map1.put(20 , "王五" ); System.out.println(map1); } }
Map集合也有很多种,在Java中使用不同的类来表示的,每一种Map集合其键的特点是有些差异的,值是键的一个附属值,所以我们只关注键的特点就可以了。
关于Map集合是什么,以及Map集合的体系我们先了解到这里,接下来就具体学习一下Map集合的通用方法。
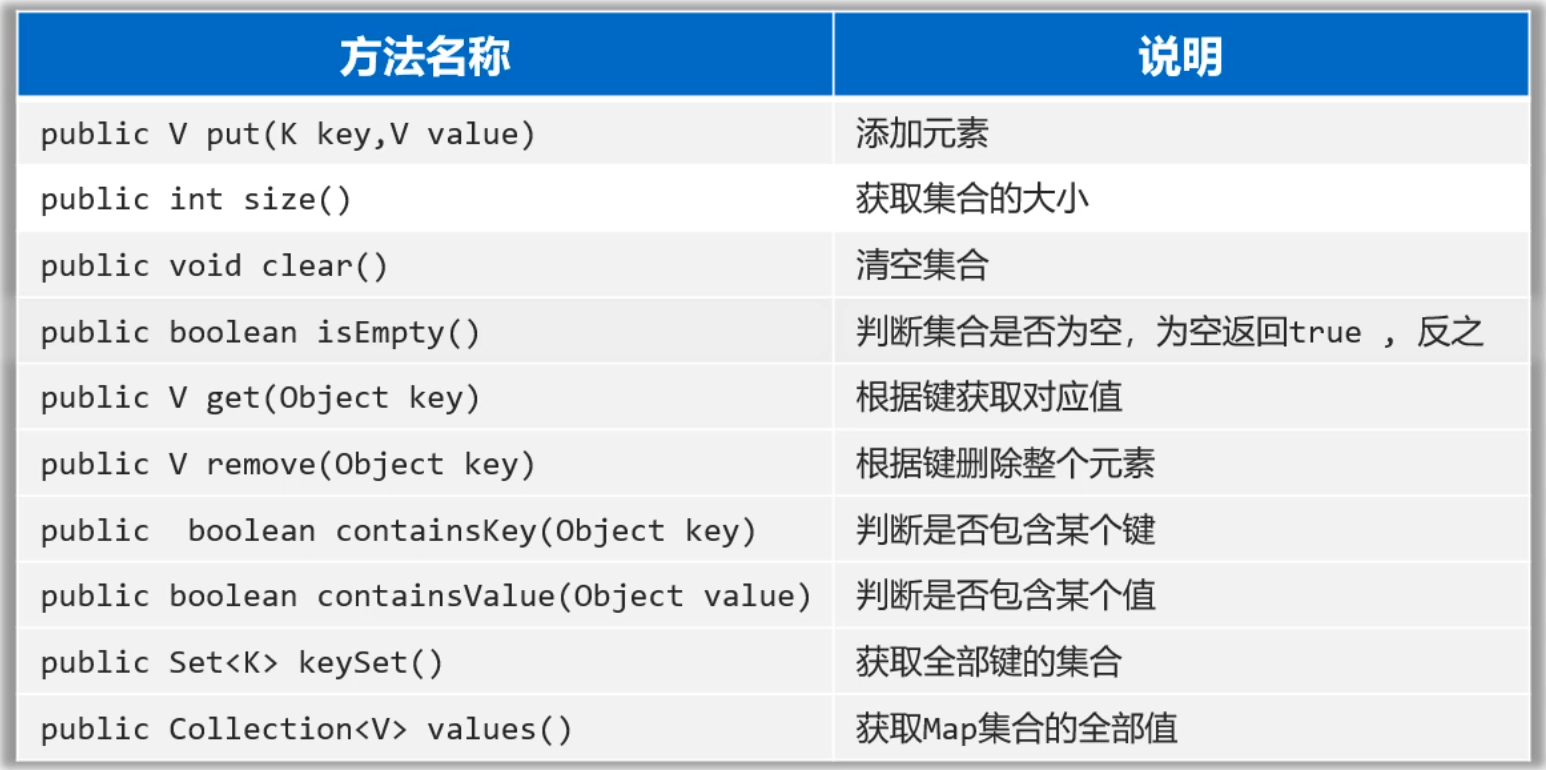
3.2 Map集合的常用方法 各位同学,上节课我们已经认识了Map集合,接下来我们学习一下Map集合提供了那些方法供我们使用。由于Map是所有双列集合的父接口,所以我们只需要学习Map接口中每一个方法是什么含义,那么所有的Map集合方法你就都会用了。
额外添加一个
Map.getOrDefault()方法
1
2
3
4
5
6
7
8
9
10
11
12
13
14
15
16
17
18
19
20
21
22
23
default V getOrDefault (Object key, V defaultValue) { V v; return (((v = get(key)) != null ) || containsKey(key)) ? v : defaultValue; } public class Demo13 { public static void main (String[] args) { Map<String, String> map = new HashMap <>(); map.put("name" , "lxj" ); map.put("age" , "24" ); map.put("sex" , "女" ); String name = map.getOrDefault("name" , "test" ); System.out.println(name); String address = map.getOrDefault("address" , "北京" ); System.out.println(address); } }
这是源码,意思就是当Map集合中有这个key时,就使用这个key对应的value值,如果没有这个key就使用默认值defaultValue
1
2
3
4
5
6
7
8
9
10
11
12
13
14
15
16
17
18
19
20
21
22
23
24
25
26
27
28
29
30
31
32
33
34
35
36
37
38
39
40
41
42
43
44
45
46
47
48
49
50
51
52
53
54
55
56
57
58
59
60
61
62
public class MapTest2 { public static void main (String[] args) { Map<String, Integer> map = new HashMap <>(); map.put("手表" , 100 ); map.put("手表" , 220 ); map.put("手机" , 2 ); map.put("Java" , 2 ); map.put(null , null ); System.out.println(map); System.out.println(map.size()); System.out.println(map.isEmpty()); int v1 = map.get("手表" ); System.out.println(v1); System.out.println(map.get("手机" )); System.out.println(map.get("张三" )); System.out.println(map.remove("手表" )); System.out.println(map); System.out.println(map.containsKey("手表" )); System.out.println(map.containsKey("手机" )); System.out.println(map.containsKey("java" )); System.out.println(map.containsKey("Java" )); System.out.println(map.containsValue(2 )); System.out.println(map.containsValue("2" )); Set<String> keys = map.keySet(); System.out.println(keys); Collection<Integer> values = map.values(); System.out.println(values); Map<String, Integer> map1 = new HashMap <>(); map1.put("java1" , 10 ); map1.put("java2" , 20 ); Map<String, Integer> map2 = new HashMap <>(); map2.put("java3" , 10 ); map2.put("java2" , 222 ); map1.putAll(map2); System.out.println(map1); System.out.println(map2); } }
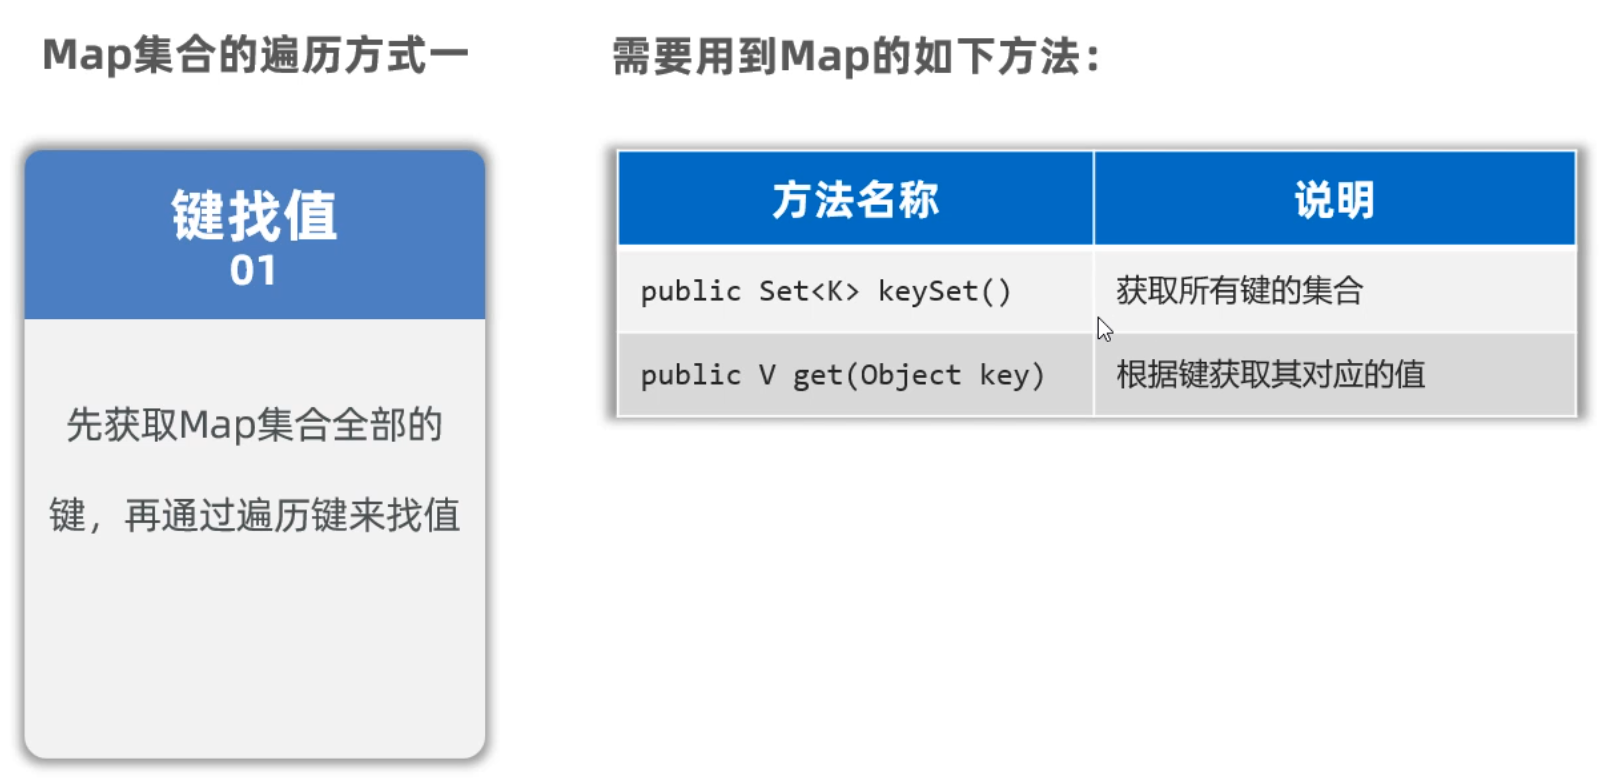
3.3 Map集合遍历方式1 Map集合一共有三种遍历方式,我们先来学习第一种,他需要用到下面的两个方法
1 2 3 4 5 6 7 8 9 10 11 12 13 14 15 16 17 18 19 20 21 22 23 24 25 26 27 28 public class MapTest1 { public static void main (String[] args) { Map<String, Double> map = new HashMap <>(); map.put("蜘蛛精" , 162.5 ); map.put("蜘蛛精" , 169.8 ); map.put("紫霞" , 165.8 ); map.put("至尊宝" , 169.5 ); map.put("牛魔王" , 183.6 ); System.out.println(map); Set<String> keys = map.keySet(); for (String key : keys) { double value = map.get(key); System.out.println(key + "=====>" + value); } } }
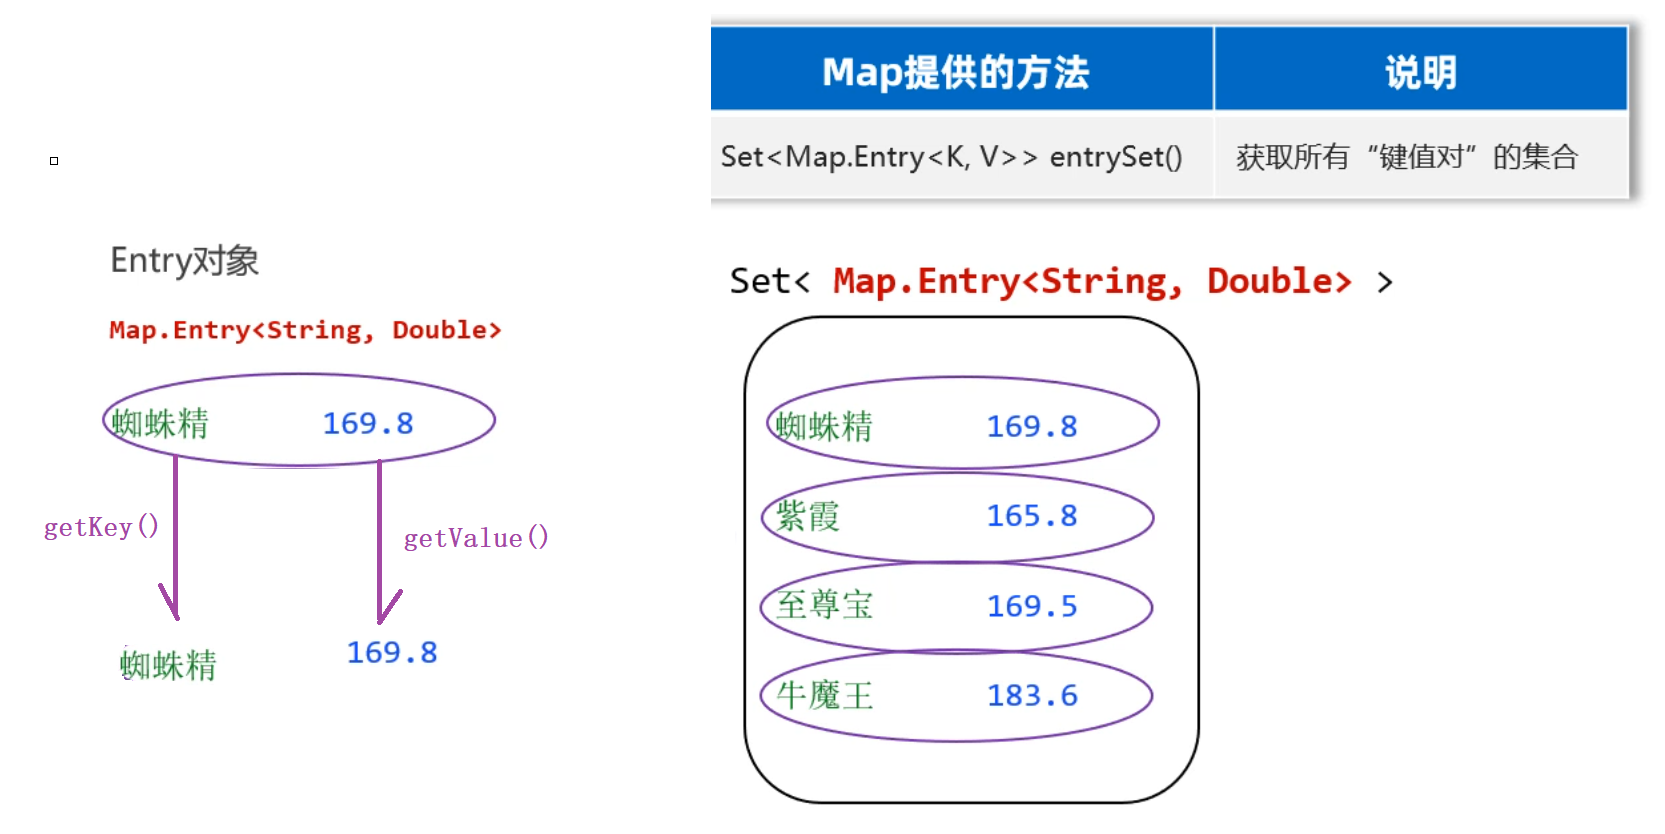
3.4 Map集合遍历方式2 各位同学,接下来我们学习Map集合的第二种遍历方式,这种遍历方式更加符合面向对象的思维。
前面我们给大家介绍过,Map集合是用来存储键值对的,而每一个键值对实际上是一个Entry对象。
这里Map集合的第二种方式,是直接获取每一个Entry对象,把Entry存储扫Set集合中去,再通过Entry对象获取键和值。
1 2 3 4 5 6 7 8 9 10 11 12 13 14 15 16 17 18 19 20 21 22 23 24 25 26 public class MapTest2 { public static void main (String[] args) { Map<String, Double> map = new HashMap <>(); map.put("蜘蛛精" , 169.8 ); map.put("紫霞" , 165.8 ); map.put("至尊宝" , 169.5 ); map.put("牛魔王" , 183.6 ); System.out.println(map); Set<Map.Entry<String, Double>> entries = map.entrySet(); for (Map.Entry<String, Double> entry : entries) { String key = entry.getKey(); double value = entry.getValue(); System.out.println(key + "---->" + value); } } }
3.5 Map集合遍历方式3 Map集合的第三种遍历方式,需要用到下面的一个方法forEach,而这个方法是JDK8版本以后才有的。调用起来非常简单,最好是结合的lambda表达式一起使用。
1 2 3 4 5 6 7 8 9 10 11 12 13 14 15 16 17 18 19 20 21 22 23 24 25 26 27 public class MapTest3 { public static void main (String[] args) { Map<String, Double> map = new HashMap <>(); map.put("蜘蛛精" , 169.8 ); map.put("紫霞" , 165.8 ); map.put("至尊宝" , 169.5 ); map.put("牛魔王" , 183.6 ); System.out.println(map); map.forEach(new BiConsumer <String, Double>() { @Override public void accept (String k, Double v) { System.out.println(k + "---->" + v); } }); map.forEach(( k, v) -> { System.out.println(k + "---->" + v); }); } }
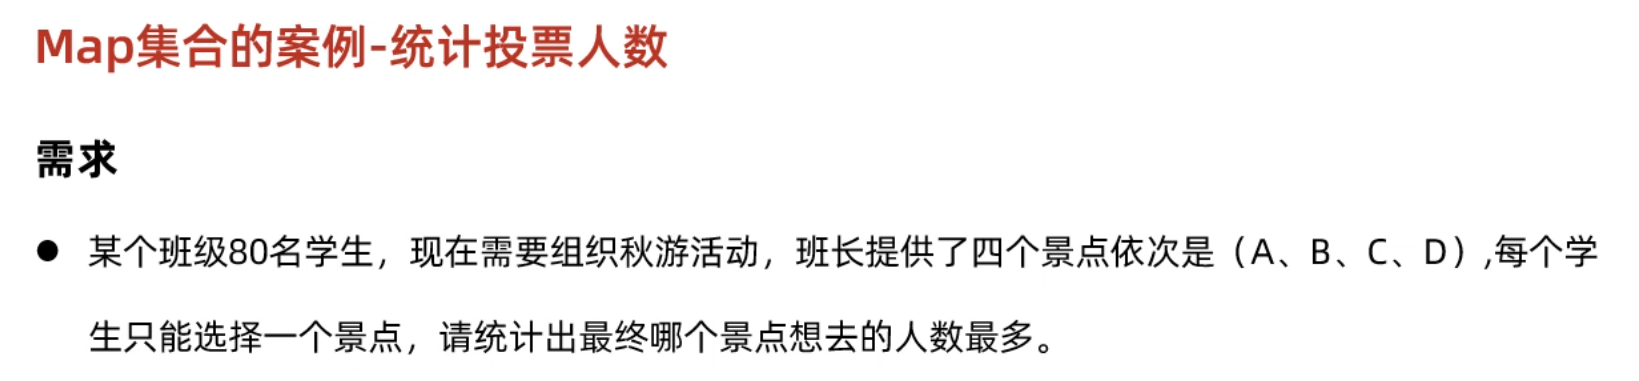
3.6 Map集合案例 学习完Map集合的基本用法之后,接下来我们做一个综合案例,将Map集合运用一下。
先分析需求,再考虑怎么用代码实现
1
2
3
4
5
1. 首先可以将80 个学生选择的景点放到一个集合中去(也就是说,集合中的元素是80 个任意的ABCD元素)2. 准备一个Map集合用来存储景点,以及景点被选择的次数3. 遍历80 个学生选择景点的集合,得到每一个景点,判断Map集合中是否包含该景点 如果不包含,则存储"景点=1" 如果包含,则存获取该景点原先的值,再存储"景点=原来的值+1" ; 此时新值会覆盖旧值
1 2 3 4 5 6 7 8 9 10 11 12 13 14 15 16 17 18 19 20 21 22 23 24 25 26 27 28 29 30 31 32 33 34 public class MapDemo4 { public static void main (String[] args) { List<String> data = new ArrayList <>(); String[] selects = {"A" , "B" , "C" , "D" }; Random r = new Random (); for (int i = 1 ; i <= 80 ; i++) { int index = r.nextInt(4 ); data.add(selects[index]); } System.out.println(data); Map<String, Integer> result = new HashMap <>(); for (String s : data) { if (result.containsKey(s)){ result.put(s, result.get(s) + 1 ); }else { result.put(s, 1 ); } } System.out.println(result); } }
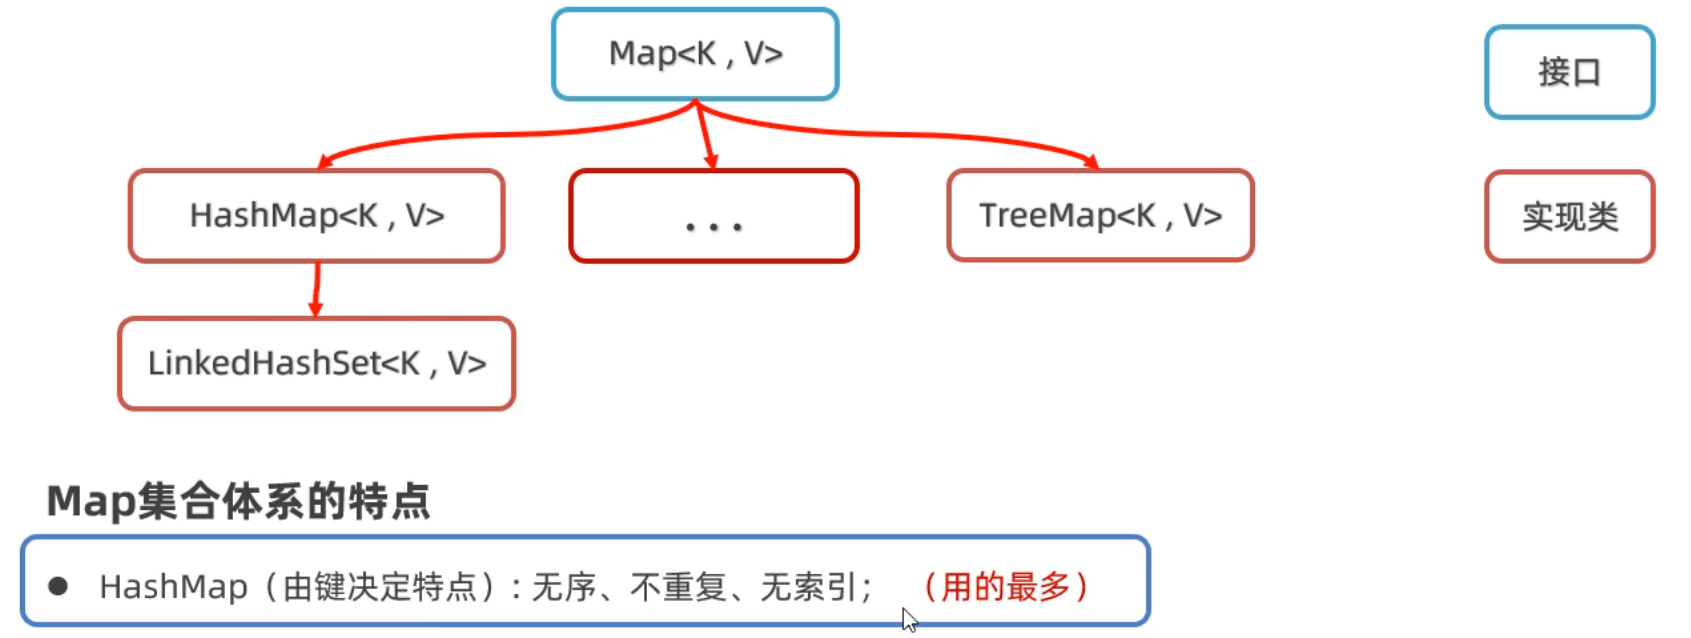
四、Map集合实现类 下面我们要学习的是Map接口下面的是三个实现类HashMap、LinkedHashMap、TreeMap。实际上这三个实现类并没有什么特有方法需要我们学习,它们的方法就是前面学习Map的方法。这里我们主要学习它们的底层原理。
1.1 HashMap 首先,我们学习HashMap集合的底层原理。前面我们学习过HashSet的底层原理,实际上HashMap底层原理和HashSet是一样的。为什么这么说呢?因为我们往HashSet集合中添加元素时,实际上是把元素作为添加添加到了HashMap集合中 。
下面是Map集合的体系结构,HashMap集合的特点是由键决定的: 它的键是无序、不能重复,而且没有索引的 。再各种Map集合中也是用得最多的一种集合。
刚才我们说,HashSet底层就是HashMap,我们可以看源码验证这一点,如下图所示,我们可以看到,创建HashSet集合时,底层帮你创建了HashMap集合;往HashSet集合中添加添加元素时,底层却是调用了Map集合的put方法把元素作为了键来存储。所以实际上根本没有什么HashSet集合,把HashMap的集合的值忽略不看就是HashSet集合。
HashSet的原理我们之前已经学过了,所以HashMap是一样的,底层是哈希表结构。
1
2
3
4
5
6
7
8
9
10
11
12
13
14
15
16
17
18
19
20
21
22
23
24
25
26
HashMap底层数据结构: 哈希表结构 JDK8之前的哈希表 = 数组+链表 JDK8之后的哈希表 = 数组+链表+红黑树 哈希表是一种增删改查数据,性能相对都较好的数据结构 往HashMap集合中键值对数据时,底层步骤如下 第1 步:当你第一次往HashMap集合中存储键值对时,底层会创建一个长度为16 的数组 第2 步:然后将键和值封装成一个对象,叫做Entry对象 第3 步:再根据Entry对象的键计算hashCode值(和值无关) 第4 步:利用hashCode值和数组的长度做一个类似求余数的算法,会得到一个索引位置 第5 步:判断这个索引的位置是否为null ,如果为null ,就直接将这个Entry对象存储到这个索引位置 如果不为null ,则还需要进行第6 步的判断 第6 步:继续调用equals方法判断两个对象键是否相同 如果equals返回false ,则以链表的形式往下挂 如果equals方法true ,则认为键重复,此时新的键值对会替换就的键值对。 HashMap底层需要注意这几点: 1. 底层数组默认长度为16 ,如果数组中有超过12 个位置已经存储了元素,则会对数组进行扩容2 倍 数组扩容的加载因子是0.75 ,意思是:16 *0.75 =12 2. 数组的同一个索引位置有多个元素、并且在8 个元素以内(包括8 ),则以链表的形式存储 JDK7版本:链表采用头插法(新元素往链表的头部添加) JDK8版本:链表采用尾插法(新元素我那个链表的尾部添加) 3. 数组的同一个索引位置有多个元素、并且超过了8 个,则以红黑树形式存储
从HashMap底层存储键值对的过程中我们发现:决定键是否重复依赖与两个方法,一个是hashCode方法、一个是equals方法。有两个键计算得到的hashCode值相同,并且两个键使用equals比较为true,就认为键重复。
所以,往Map集合中存储自定义对象作为键,为了保证键的唯一性,我们应该重写hashCode方法和equals方法。
比如有如下案例:往HashMap集合中存储Student对象作为键,学生的家庭住址当做值。要求,当学生对象的姓名和年龄相同时就认为键重复。
1
2
3
4
5
6
7
8
9
10
11
12
13
14
15
16
17
18
19
20
21
22
23
24
25
26
27
28
29
30
31
32
33
34
35
36
37
38
39
40
41
42
43
44
public class Student implements Comparable <Student> { private String name; private int age; private double height; @Override public int compareTo (Student o) { return this .age - o.age; } @Override public boolean equals (Object o) { if (this == o) return true ; if (o == null || getClass() != o.getClass()) return false ; Student student = (Student) o; return age == student.age && Double.compare(student.height, height) == 0 && Objects.equals(name, student.name); } @Override public int hashCode () { return Objects.hash(name, age, height); } public Student () { } public Student (String name, int age, double height) { this .name = name; this .age = age; this .height = height; } @Override public String toString () { return "Student{" + "name='" + name + '\'' + ", age=" + age + ", height=" + height + '}' ; } }
写一个测试类,在测试类中,创建HashMap集合,键是Student类型,值是Stirng类型
1 2 3 4 5 6 7 8 9 10 11 12 13 public class Test1HashMap { public static void main (String[] args) { Map<Student, String> map = new HashMap <>(); map.put(new Student ("蜘蛛精" , 25 , 168.5 ), "盘丝洞" ); map.put(new Student ("蜘蛛精" , 25 , 168.5 ), "水帘洞" ); map.put(new Student ("至尊宝" , 23 , 163.5 ), "水帘洞" ); map.put(new Student ("牛魔王" , 28 , 183.5 ), "牛头山" ); System.out.println(map); } }
上面存储的键,有两个蜘蛛精,但是打印出只会有最后一个。
HashMap方法集合 HashMap
put(K key, V value): 将指定的键和值关联到HashMap中。
1
2
3
HashMap<String, Integer> hashMap = new HashMap <>(); hashMap.put("One" , 1 ); hashMap.put("Two" , 2 );
get(Object key): 返回指定键映射到的值,如果该键不在映射中,则返回null。
1 Integer value = hashMap.get("One" );
remove(Object key): 从HashMap中移除指定键及其对应的值。
containsKey(Object key): 如果HashMap包含指定键,则返回true。
1 boolean containsKey = hashMap.containsKey("One" );
containsValue(Object value): 如果HashMap包含指定值,则返回true。
1 boolean containsValue = hashMap.containsValue(2 );
size(): 返回HashMap中键值对的数量。
1 int size = hashMap.size();
keySet(): 返回包含HashMap中所有键的Set。
1 Set<String> keySet = hashMap.keySet();
values(): 返回包含HashMap中所有值的Collection。
1 Collection<Integer> values = hashMap.values();
entrySet(): 返回包含HashMap中所有键值对的Set。
1 Set<Map.Entry<String, Integer>> entrySet = hashMap.entrySet();
clear(): 从HashMap中移除所有映射关系。
1.2 LinkedHashMap 学习完HashMap集合的特点,以及底层原理。接下来我们学习一下LinkedHashMap集合。
LinkedHashMap集合的特点也是由键决定的:有序的、不重复、无索引 。
1 2 3 4 5 6 7 8 9 10 11 12 13 14 15 public class Test2LinkedHashMap { public static void main (String[] args) { LinkedHashMap<String, Integer> map = new LinkedHashMap <>(); map.put("手表" , 100 ); map.put("手表" , 220 ); map.put("手机" , 2 ); map.put("Java" , 2 ); map.put(null , null ); System.out.println(map); } }
运行上面代码发现,如果是LinedHashMap集合键存储和取出的顺序是一样的
如果是HashMap,键存储和取出的顺序是不一致的
LinkedHashMap的底层原理,和LinkedHashSet底层原理是一样的。底层多个一个双向链表来维护键的存储顺序。
取元素时,先取头节点元素,然后再依次取下一个几点,一直到尾结点。所以是有序的。
1.3 TreeMap 最后,我们再学习Map集合下面的另一个子类叫TreeMap。根据我们前面学习其他Map集合的经验,我们应该可以猜出TreeMap有什么特点。
TreeMap集合的特点也是由键决定的,默认按照键的升序排列,键不重复,也是无索引的。
排序方式1: 写一个Student类,让Student类实现Comparable接口
1 2 3 4 5 6 7 8 9 10 11 12 13 14 15 16 17 18 19 20 21 22 23 24 25 26 27 28 public class Student implements Comparable <Student>{ private String name; private int age; private double height; public Student () {} public Student (String name, int age, double height) { this .name=name; this .age=age; this .height=height; } @Override public int compareTo (Student o) { return this .age-o.age; } }
排序方式2: 在创建TreeMap集合时,直接传递Comparator比较器对象。
1 2 3 4 5 6 7 8 9 10 11 12 13 14 15 16 17 18 19 public class Test3TreeMap { public static void main (String[] args) { Map<Student, String> map = new TreeMap <>(new Comparator <Student>() { @Override public int compare (Student o1, Student o2) { return Double.compare(o1.getHeight(), o2.getHeight()); } }); map.put(new Student ("蜘蛛精" , 25 , 168.5 ), "盘丝洞" ); map.put(new Student ("蜘蛛精" , 25 , 168.5 ), "水帘洞" ); map.put(new Student ("至尊宝" , 23 , 163.5 ), "水帘洞" ); map.put(new Student ("牛魔王" , 28 , 183.5 ), "牛头山" ); System.out.println(map); } }
这种方式都可以对TreeMap集合中的键排序。注意:只有TreeMap的键才能排序,HashMap键不能排序。
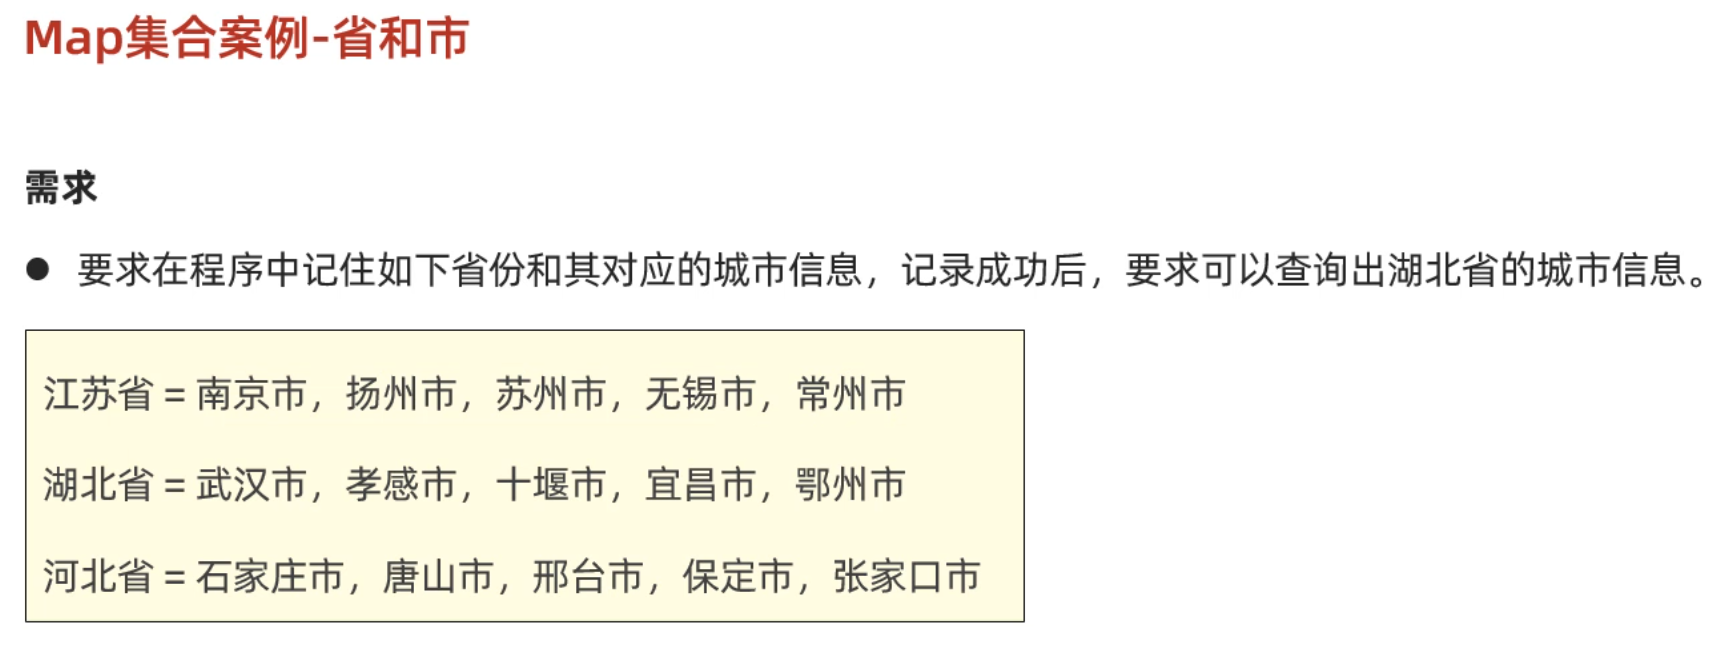
1.4 集合嵌套 各位同学,到现在为止我们把Map集合和Collection集合的都已经学习完了。但是在实际开发中可能还会存在一种特殊的用法。就是把一个集合当做元素,存储到另一个集合中去,我们把这种用法称之为集合嵌套。
下面通过一个案例给大家演示一下
1
2
3
4
5
1. 从需求中我们可以看到,有三个省份,每一个省份有多个城市 我们可以用一个Map集合的键表示省份名称,而值表示省份有哪些城市 2. 而又因为一个省份有多个城市,同一个省份的多个城市可以再用一个List集合来存储。 所以Map集合的键是String类型,而指是List集合类型 HashMap<String, List<String>> map = new HashMap <>();
1 2 3 4 5 6 7 8 9 10 11 12 13 14 15 16 17 18 19 20 21 22 23 24 25 26 27 28 29 30 31 32 33 34 public class Test { public static void main (String[] args) { Map<String, List<String>> map = new HashMap <>(); List<String> cities1 = new ArrayList <>(); Collections.addAll(cities1, "南京市" ,"扬州市" ,"苏州市" ,"无锡市" ,"常州市" ); map.put("江苏省" , cities1); List<String> cities2 = new ArrayList <>(); Collections.addAll(cities2, "武汉市" ,"孝感市" ,"十堰市" ,"宜昌市" ,"鄂州市" ); map.put("湖北省" , cities2); List<String> cities3 = new ArrayList <>(); Collections.addAll(cities3, "石家庄市" ,"唐山市" , "邢台市" , "保定市" , "张家口市" ); map.put("河北省" , cities3); System.out.println(map); List<String> cities = map.get("湖北省" ); for (String city : cities) { System.out.println(city); } map.forEach((p, c) -> { System.out.println(p + "----->" + c); }); } }


 wechat
 alipay

